Find info about electronics prices, discounts, top deals in link, like US below.
Showing posts with label Tips and Trick. Show all posts

How to install android sdk ubuntu and windows


Actually I just wanted to give you a little tutorial or how to install android sdk on your pc or laptop with ubuntu os, but the same might as well install android sdk emulator on your computer or laptop pc with windows os like windows xp, windows 7, or Windows 8 as do almost the same and little disparate.

In android sdk we can use whatsapp application or WeChat on a computer with the help of this emulator android sdk installation, and if your computer is connected to the Internet then the android sdk emulator has been able to connect to the internet without any setting.
android sdk emulator ubuntu

* How to install android sdk emulator on ubuntu:


1. Install Java or OpenJDK on your ubuntu.

Open synaptic package manager or ubuntu software center and type "OpenJDK" without quotes then there will be available in accordance with the OpenJDK version of ubuntu 10.04 ubuntu instance it would appear OpenJDK 6 right-click and mark for install. Wait until the process is complete. To install openjdk-7 see here
In terminal :
#sudo apt-get install openjdk-6-jre

2. Download the Android SDK emulator here.

3. Extract the Android SDK has been downloaded into documents or anywhere up as needed :).

4. Open terminal by pressing CTRL + ALT + T or click Applications -> Accessories -> Terminal. Typing sudo su and enter your password.

5. Navigate your terminal to the android sdk folder. For example, if the Android SDK folder located in Documents then follow these steps:

  • cd Documents --> cd android-sdk-linux -- > cd tools --> ./android
  • So do not want typing like the above do as follows:

    - Open a terminal its way as the No. 4 typing "gedit ~ /. Bashrc" without the quotes and enter the text below at the very top and then save.
  • #AndroidDev PATH export PATH=${PATH}:/home/???/Documents/android-sdk-linux/tools export PATH=${PATH}:/home/???/Documents/android-sdk-linux/platform-tools
note:the name of the red "/ home /??? / Documents / android-sdk-linux / tools" and that the second is the folder where I store the android sdk. Adjust to the folder where you saved.- Still diteminal the following command "gedit / etc/udev/rules.d/51-android.rules" without quotes and input the text below ".

SUBSYSTEM=="usb", ATTRS{idVendor}=="0bb4", MODE="0666"

SUBSYSTEM=="usb", ATTRS{idVendor}=="0502", MODE="0666"

SUBSYSTEM=="usb", ATTRS{idVendor}=="12d1", MODE="0666"

SUBSYSTEM=="usb", ATTRS{idVendor}=="1004", MODE="0666"

SUBSYSTEM=="usb", ATTRS{idVendor}=="22b8", MODE="0666"

SUBSYSTEM=="usb", ATTRS{idVendor}=="04e8", MODE="0666"

SUBSYSTEM=="usb", ATTRS{idVendor}=="0fce", MODE="0666"

SUBSYSTEM=="usb", ATTRS{idVendor}=="0489", MODE="0666"

SUBSYSTEM=="usb", ATTRS{idVendor}=="18d1", SYMLINK+="android_adb", MODE="0666"

SUBSYSTEM=="usb", ATTRS{idVendor}=="04e8", MODE="0666", GROUP="plugdev"

To install the android sdk at the root can be viewed of the source ubuntu comunity here.

Then save and reboot or restart your laptop or computer. So that when you open the android sdk does not necessarily have to enter the android sdk folder on terminal. simply by opening a terminal and sudo password and then android sdk android in laptop or pc you'll leave.

6. Open a terminal and typing sudo ubuntu android then enter your password.

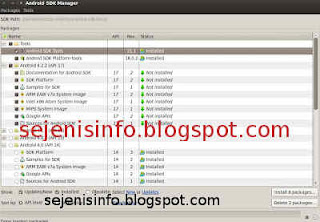
7. After the android SDK emulator appears and then select the check tools and android files that get installed like in the picture below.
android avd emulator ubuntu

In the picture above I did install android 4.2 version and you can choose the version that will be installed android as android ICS, android honeycomb etc as you wish. At the bottom of the Extras folder with writing a check Android support libraries, Google play service, Google usb driver and so adjust it with the needs.

8. Click the install packages and licenses accept check, wait a while until installation is complete.

9. After install android sdk on PC or laptop is complete then click the Tools button located at the top left after the packages.

10. After the new window appears select the window or click the Manage button AVDS ... and click the New button on the right existing, well here you can choose your favorite android version there is a 10 inch size to a small size, select the size of the 7-inch or 5 inch that if the computer or laptop has a less specs computer so you are not too hang up or heavy and lag.

11. A new window will appear when the button is clicked and a new Insert your name free android for example name is androidku, android select your choice according to size preference. If you want to change the size of the internal memory replace it from 200 to 512 for example, and the contents of sd card to 1024 = 1GB and click OK.

12. If it is then in view avd there will be a new menu that has been created is androidku. Click start to open its android os android will appear according to your choice.

* To install the Android SDK on windows is the same way.


1. Download and Install the java application here.

2. Android Download for windows here.

3. Install android sdk on windows and if it is open android sdk installed and did his manner as above at the start of No. 7.

Video how to install android sdk emulator on pc or laptop


Posted by: Zein Okeh Share Everything, Updated at: Monday, May 06, 2013

How to know windows version installed


Computer or laptop which already windows installed either windows xp, windows 7 or windows 8, perhaps we do not know which version of Windows that is used on our pc. There are many versions of windows like windows xp service pack 1, windows xp sp2 and also on windows xp sp3 there are several other versions as windows xp for gaming, windows xp media center, windows xp home edition, or windows with x32 or x64 bit etc..

If I could mention one by one until dawn :). Our PC has installed the windows being installed by others of course we do not know the most likely version is used, the following well below I will give a little info about how to know which version of Windows that is used in your computer or laptop.

How to know the version of windows on windows xp and windows 7:

In windows to know which version of Windows that is used almost same way, but not nearly but thats same way.

1. If its on the desktop or on the main screen there is icon my computer, just right click mouse on my computer icon and click properties that its.

2. If the My Computer icon on the main screen or on the desktop it does not exist then the way we use open windows explorer then right click the mouse and then click properties.
See the example image below.

how to know windows version


Display system properties windows xp deluxe version.
system properties windows


3. If you want to see the whole system including the use dxdiag version used then use the following:
- Click start and click run.
run button windows


- Typing "dxdiag" without quotes, then enter will be out the display as shown below.
dxdiag windows xp deluxe


For his appearance may vary slightly depending on the theme used.

How to know windows 8 version:
For an extra little info for those who may be new including my first time on using windows 8, may be will confused to looking for run and to run some command like cmd, dxdiag etc..Here a little info to find it:

1. Open windows explorer.
2. Right click mouse button and select Properties.

How to enter to run in Windows 8:

1. Move the mouse to the right monitor, will be out a menu.
windows 8 menu


2. Select the top menu the search menu and typing cmd.
windows 8 search command run dxdiag

If you want to open cmd as adminitrator just right click your on cmd icon and see on your screen below that will appear the options.


Posted by: Zein Okeh Share Everything, Updated at: Sunday, May 05, 2013

How to hide file in android apps


There are some important files and folders in a gadget like android, laptops and mobile phones as well as several other gadgets, allowing others to access the confidential files or files that others should not know it could be used either intentionally or unintentionally. What more if we use android which is often used by others as a friend, brother, sister and others. For that we need to hide files and folders is as safe as possible so that important files such as music, song, video, and files and folders will be maintained and can not be found by others.

So the question now is, how to hide files in android?, Now it is in fact not a difficult thing to do because in google play alone there are some android apps to hide video files, songs and other files easily.

My choice to hide files application in android are two android applications use very easy and also free to be downloaded Adao file manager and  File hide expert.

How to hide files in android with Adao File manager:

1. Download and install Adao file manager. But this apk on google play is not available, can be found in several forums and others.

2. Besides could to hide file and foler in android, Adao file manager also can be used for the file manager as a tool to open the folder, data on android, if in windows, Adao file manager similar to Windows Explorer. Back up the application, task manager etc..

3. After installed, open Adao file manager application, select the SD card and select the data or files will be hidden by tapping the file until it comes out and sliding up the options menu so that the menu option Hide files visible. File hide option menu picture is at the bottom.
hide file di android

4. After the file menu Hide seen just click the options menu and any files that will be hidden will disappear from menu.

5. To restore files that have been hidden, Close Adao file manager or back by clicking the back button so Adao file manager located in the main menu. There are several menu options upward shift so posts will be hidden files visible. Click the Hidden files or writing for the first time we are given to create your own password, enter the password that will be made, after the password is created and has been entered into the Hidden files and files that are hidden will be there, click on the file to be restored to the original place of a single click or click longer.
restore file on android hide

How to hide files and folders in android with File Hide  Expert:


1. Download and install File Hide expert here.

2. Once installed open the app and to hide files such as video, song or music, pictures and also click the folder or picture folders that reside on the top right.
hide files on android
3. Select the folder or file that will be hidden by clicking the plus button on the right.
hide expert android files

4. Once files or folders are on the menu hide, click the hide button to hide all files or folders, these are available at the bottom left. And to restore the files and folders in hide just click the unhide all button or click the x button.
hide folder on android

5. Good luck.


Posted by: Zein Okeh Share Everything, Updated at: Wednesday, May 01, 2013

Screen capture for android with or without apps


Starting from the question in accusing me of someone who has the android phone "How do I capture picture on android?" Then I told screenshots android app? that same question with differend woords :) its kind that is a question when it was still new on using that android and not yet one week using android phone, in fact initially I also do not know how do it! :).

But since the Internet is now easier then I was open an internet in my room and searching in google, there are many applications that are in the google search, there could be no need to use the application and without root and there is also to make screen shot or screen capture applications need application and root. It still depends on the choice of you which is the best to use.

Also happened to be at that time I found a blog that I forgot to mention that blog and I'm sorry for him to posting back taht knowledge in my blog, way without the screenshot application on android i use samsung galaxy young. Ow much of a coincidence, is not really a coincidence everything is set up. The first I gave a screen capture images in a way that no android apps.

* How to Screenshot image without android application and without root on samsung galaxy Y GT S5360.


1. Take your phone and turn on:).
2. Screen is ready to be shot and then press a button on the center continues to press the back button on the the right once, the last push button on / of phone one and the picture will be soon in capture or in print to the screenshots folder.

screenshot image on android


3. To know the results open the gallery and see the screenshots folder there are the results.

* How to screenshot or capture an image in android with the application:

There are some screen shots android apk free or paid which are in google play we can choose according to our choice and according to your needs.

1. No Root Screenshot It, android screen capture application which is paid but its use does not need to root our android phone so it can be directly used.
2. Ultimate screenshots made ​​by Ice Cold Apps. Screen capture apps for android that there are two options one could with root and does not require root.
3. Screenshot by Kastor Soft, after I try and I read before installing android on phone we've had rooted. Though we can save the results of his capture to image JPG, BITMAP or PNG.
4. Screenshot Free By Wise Shark Software, this one I have not tried.

Posted by: Zein Okeh Share Everything, Updated at: Wednesday, April 24, 2013

Photoshop for android apk download


Photoshop is a tool or application to edit our pictures to make the picture better and more in line with what we would expect, is a tool that does what is necessary for us as a photographer, although not a photographer but an amateur using photoshop can make the picture better. Photoshop is a tool that can be used in computers can also be used on android however photoshop for android, photoshop version is slightly different from the computer, editing tools become more simple and simple alias, his name is Adobe photoshop express.

Adobe Photoshop Express is a tool or android apps to edit photos easily run you can feel yourself.
Photoshop for Android is easier to use after we install android into us, then we run the photoshop express, and will be out the photos of us who are in the camera folder.

photoshop express android

photoshop for android

Step how to edit photos in photoshop express android conducted in:
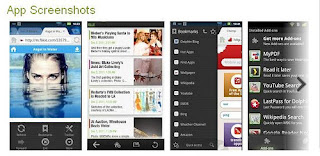
1. Install Photoshop express, can be opened in the google play here. Or you can download by search google.
2. Once installed run photoshop express on your android and then there will be found your photos that are in the camera folder in android.
3. Select an image to be edited by clicking on the photo.
4. After the selected photo and click open image such as stripes and click edit photos, can be seen an example in the image below:
edit photo with photoshop android
photoshop settings in android
5. Began to edit our photos in photoshop android, top right side we can see the button to edit photos, ranging from the right to the left side of the first to give a special effect given by photoshop and also to provide border so we will look gorgeous photo:
with photoshop edit photo in android
photoshop for android make easy
6. The second is to provide the soft focus on our pictures to be edited so that the image can be seen clearly:
soft focus photo shop android
editing photos in android

7. Then the third part of the right button is the key to providing better color, and brithnes which will be more visible light.
exposure photos on android
exposure photoshop android

8. The last button the first button from the left or the fourth from the right is a button to crop the image, rotate and reverse straighten photos.

9. Once completed in the edit do not forget to save the photo, to save photos can click the button below the bottom right can see the image below:
save photoshop edit photo from android
photshop  save tablet
10. To upload to facebook or twitter can click the button lines on the android task bar and click the upload button :
upload photos to facebook in android
upload photo to facebook
Adobe photoshop express it as the name suggests editing the quick and easy way. But for those of you who are not so fond of photoshop express and want to edit it even better you can use the touch photoshop, but photoshop is paid can be found here


Posted by: Zein Okeh Share Everything, Updated at: Tuesday, April 16, 2013

Windows 8 and windows 7 dual boot system


Around a couple of days ago my sister bought a samsung notebook with AMD A6-4400M APU Radeon (tm) HD graphics 2.70 GHz and 2 GB ram. That's just the information I used to create a dual boot windows 7 and windows 8 on the samsung laptop.

And before that I had made a post on how to dual boot windows 8 and windows xp on the pc, and dual boot or triple boot between windows, ubuntu linux and android. Whatever can be done on a computer or laptop that we have provided a laptop or pc we already meet the criteria or have the specs required for an operating system.

How to install dual boot windows 7 and windows 8 there are some things that need attention or need her to know some of the steps that must be done first. In samsung Laptop AMD A6-4400M vision the first thing change bios settings by clicking the F2 key when the laptop first time it runs, and then select the first boot the system it is cdrom first boot. Usually there are cdrom his name but I forgot the name of cd-romnya, because now the laptop was taken by my sister :).
dual boot windows 7 and windows 8

The first step to dual boot windows 7 and windows 8 are:


1. Make a partition on the hard drive, because its a new laptop so I created three partitions ie Drive C or the first partition is 100 GB,  drive D or a second partition around 50GB and for the rest Drive E for storage of data such as music files, video etc..
For the hard drive is already partitioned or already installed windows to make sure the partition is windows 8 windows 7 minimal  15G.
To create partition with  partition wizard tool see the video below :
2. Once the partition is created it is time to install the windows. First time that must be installed on your pc or laptop is windows 7, but it is okay if you want to install Windows 8 first and write cd key or serial number windows 7 to a paper for later needed during installation, enter into the windows 7 cd into cd-rom then restart your PC or laptop and then on the computer screen or laptop turns while press the F11 key to bring up the boot options of the first instance for the first boot drive and a second boot to cd-rom, now that we chose is the second boot is to boot to cdrom, but on some computers or laptops are different settings so if F11 can not work try by pressing F9 or F10 or F12. Or if the cd rom on your computer or laptop is damaged then it can do the installation of windows 7 on usb drive, to make a boot usb drive windows 7 can be found here.
3. If you've booted into the cd-rom then install windows 7 will run immediately and follow the steps according to instructions there. But to partition or select the appropriate partition we created earlier as the partition or drive C then select the partition, my advice would select the first partition or drive C to perform the installation windows 7, when the first partition or drive C: is for megabytes eg 100 MB or 200 MB and more, then select Drive D: a magnitude of more than 15 GB, the partition size of 100 or 200 mb and size assortment but I know size is not more than 500 MB is for the system partition or boot partition windows reverse the will be used for booting.
4. Once Windows 7 is installed on your computer or laptop, then the next ketahap.
5. Insert the CD or usb windows 8 restart your laptop or computer, as usual at the start screen appears click or press the F9 can boot, F10, F11 or F12 depending on your PC settings.
6. Once the PC or laptop is booting to the cdrom windows 8 and then select the appropriate languange and select the U.S. keyboard click next and install, well for its partition select the partition you created for Windows 8, for example Windows 7 installed on Drive C then windows 8 in installed on drive D. click next and the installation will begin just follow the steps in accordance with the instructions given there.
7. Once Windows 8 is installed it after restarting the computer or laptop then there are two choices aka boot the windows 7 and windows 8.
8. Good luck.

If you still get confused comments below this post. Thank you.


Posted by: Zein Okeh Share Everything, Updated at: Monday, February 18, 2013

Setup Dual boot windows 8 and windows xp


Setup dual boot windows 8 with windows xp is very easy to do, and if you want to dual boot with windows 7 can be done. But in this post I will discuss is to make dual boot windows xp and windows 8.

Windows 8 is the latest product of windows that can be used on tablet pc, which has a x86 and x64 systems and most likely Windows 8 can not be used on android tablet because they are different systems, the android system uses ARMv7  that can not be used to install windows 8, but you must use LIBSDL or Bochs, an app that makes it possible to run different operating systems like linux ubuntu on android, windows 98, windows xp etc..
windows boot manager
Here's how to set up a computer to dual boot between windows 8 and windows xp.

1. Create two partitions, the first drive: C for use windows xp and drive: D to use Windows 8. Minimal capacity to Drive: C is 10GB while the Drive: D 20GB.
2. After making two partitions, install windows xp first. Iinstall windows xp installation at Drive: C.
3. Furthermore, after installing windows xp do windows 8 installed on drive D.
4. Once both pieces of the operating system is installed, the boot will stay on windows 8.
5. In windows 8 do the settings for dual boot, by hover your mouse cursor to the right of your monitor which will display a widget to do the setting.
6. Click on Settings and then click Control Panel.
7. In the Control Panel window click System and Security, click System
8. On the left side of the window system, click on the fourth is Advanced system settings.
9. Once the window opens, click Settings in the Startup and Recoverry which will display a new window that there are two options in the Default operating system Operating system select Earlier Version of Windows and then click Ok.
dual boot windows xp and windows 8

10. Restart the computer, if it is successful then the first look at the computer at startup option menu will pop up a window to select Earlier Version of Windows and Windows 8, Earlier Version of Windows is the first operating system to install that is the windows xp.

May be useful

Posted by: Zein Okeh Share Everything, Updated at: Monday, November 05, 2012

Angry birds star wars download in 8th november


The latest angry birds games will be downloaded later on 8 november, angry bird is the game version of star wars.
Rovio developers are in Finland is developing various features of the angry birds star wars by adding a few characters on star wars movie such as Luke sky walker and Princes Leia. In this angry bird star wars game enemies were adjusted with the enemy star wars style, how to play almost the same with previous angry birds.
angry bird starwars

The uniqueness of this game is the character that star wars style birds with a laser sword held by Luke Skywalker is on star wars movie, so by playing star wars Angry birds with red bird with a style that will emit a laser sword as they will destroy his enemies, different from the little pink birds Princes Leia,she will emit a pink laser into his enemies when started to fly.


You can download Angry Birds Star Wars here
Reference : Berita Teknologi

Posted by: Zein Okeh Share Everything, Updated at: Saturday, November 03, 2012

Asus Transformer TF101 only in apx mode wont turn on


One of the causes of android wont to turn on and always only in apx mode because the internal sdcard corrupted or the system that can handle it.

My experienced this on the asus transformer tf101, after install the jellybean rom, android can not boot. If the boot would be very long and never got into the display, booting animation that goes on. After I open the adb shell on the computer and I am backing up data on sdcard, then I format mmcblk0p *  reboot the android become wont turn on, always on the circumstances only in apx mode.

Many times I tried to start it but it still won't turn on. My Asus transformer tf101 is broken, that's my mind at that time. I've given up.


The first time I was very shocked and I think my android is broken and tf101 could not be used to fix, I was to take to the place of service, but I am curious, then i plug my android to computer and I open in terminal ubuntu and windows xp in cmd.exe then I typed in terminal lsusb and there are my android tablet on the State of apx mode, and I look in the windows device manager did in fact exist only in android apx mode.

Then I search in google one by one I open forum and tried every step in forum but there has never been a successful android still only in apx mode cannot be turned on, I followed the steps like tap the power button and the volume button down still does not want to turn on.

It was the thing to do with the way flash again with nvflash and download the firmware to suit our android official site.
easyflasher flash asus tf101
For those who use the asus transformer if the tablet in apx mode only can use the EasyFlasher, can only be used for the sbkv1 and sbkv2 versions, follow the steps below:

1. Download EasyFlasher here

2. Download the appropriate firmware with the tablet in asus official website, here

3. Save the download in a folder that is in asusupdate in folder EasyFlasher

4. Do not extract with winrar or winzip.

5. Click the button asus stock zip/unbrick, wait a few minutes

6. Once done restart the asus tf101.


Using EasyFlasher then the Asus tf101 android can be unroot  or unbrick. To pass easyflasher rooting could use as well, with the click of a button Click me on the third part with the root and add the CWM recovery with three option on the first button, as shown in the image above.

EasyFlasher on XDA Developers site here

I hope this helps


Posted by: Zein Okeh Share Everything, Updated at: Thursday, November 01, 2012

Asus tf101 problems wont boot always back to cwm recovery


It looks like my Tablet Asus transformer tf101 having problems, always go back and forth after install the bootloader and install the ROM between ICS and Jellybean in cwm recovery, but the same result, i.e. at the time after reboot the tablet back to the display of the CWM recovery, do not want to boot into Android operating system.

At first after I update asus tablet to jellybean 4.1.2, do not experience the problem and any boot smoothly, however after I install an application and I reboot, suddenly my android asus tablet  tf101 was unable to boot, boot takes a very long time, almost a few minutes and maybe if I leave it will continue to boot on the first screen animated images. After a few times I reboot and install the bootloader, kernel and suddenly got the asus transformer tablet tf101 was unwilling to boot always return to cwm recovery.
error android tablet
image by Aaronfisher1904 via photobucket.com


Then what I do is to format the data and systems sdcard through the CWM recovery 5.8.1.8 but the result remains the same, then I do Wipe Dalvik Cache, but in fact there is an error message that I got, the error is E: unknown volume for the path [/sd-ext].

Once I figure out the forums turned out this is due to the problematic volume and sdcard is corrupted, this makes me so confused because the only way is to repartition internal sdcard, with of course all the data contained in the android will be remove. Finally I found a way that is easy, and there are several ways that can be repeated without making data be deleted, however it makes me confused because of the way a little bit, But I decided to try the backup data in sdcard through ADB shell in terminal of ubuntu, and successfully, for data on sdcard is still available. For those who do not yet know how to backup via adb, try some of the following steps.

1. Download the Adb to linux or windows here
2. After download and install, plugs your android usb cable  with your computer.
3. Open terminal in ubuntu linux or cmd in windows, type ' ADB devices ' without quotation marks, to connect between your pc and android.
4. Once the devices are detected.
5. Type ' adb shell ' and typing ' cd/sdcard ' and typed ' ls ' to find out which data will be backed up.
6. backing up data in terminal or cmd and typing "adb pull /sdcard/data name /media/Data/backup", meaning /sdcard/data name is the data from android sdcard will be backed up and '/media/Data/backup' is the data storage .


Note: If after the adb shell and by typing cd /sdcard  there is no data then have to do is go back to cwm recovery android if tablet still open he cwm recovery and click install zip file and click install from sdcard and then click choose zip from sdcard, go back to terminal or cmd in computer, and type adb shell cd /sdcard/ -> ls, see if there is still data in the sdcard, if no then it is likely the data on sdcard is erased.


After that to perform partition on your android tablet after installing cwm recovery v 5.8.1.8 do the below.

1. Push the power button and the volume down simultaneously for about 10 seconds
2. Select advanced then select Partition SD Card
3. For the 16 GB select the 1024M i.e. 1 GB ext.
4. for Swap size you can select 0 m or whatever, wait a few moments and then reboot


If after the reboot the android is still the same result, for the asus transformer with the tf101 sbk1 and sbk2 could use easyflasher, to download easyflasher can visit  xda developers site here.

Posted by: Zein Okeh Share Everything, Updated at: Thursday, November 01, 2012

Release of jelly bean 4.1.2 for android from some ROM developers


For those of you who have done rooting may not be difficult to do so, simply by going to several forums that you like or open a site that provides a ROM that has been updated to download. That way we can update the jellybean.

There is a wide range of custom ROM that you can get for free, and of course if you've done rooting for your android. To do the rooting there are some things to consider, such as you can read about some important things before rooting your android phone. In order errors and the consequences can be calculated carefully.
jelly bean android os
Image by evilangel009 source flickr.com

How do i get the jelly bean update?, Maybe this is a question that our minds when we are confused to find out about the new android OS. If we do not know where we can get the latest updates as jellybean android 4.1.2 which is now available to download android ROM in multiple providers.

If you've done rooting to the your android phone, then update and do flashing would be easy to do. Just download and update custom ROM, i've just do update Android OS to my asus transformer TF101 to with jellybean Cyanogen Mod 10 nightly, jellybean version 4.1.2 which I think is very good and so far there has not been a problem. Maybe if you have the galaxy s you can directly download  Cyanogen Mod for galaxy s ROM that are already available.

There are several types of CyanogenMod that we can get such stable type, nightly, release candidate, m snapshot. and available for other android devices, like galaxy s, TF101, tenderloin, tf201, tf300t, tf700t, Samsung Galaxy Nexus (VZW), motorola etc..

There are several different settings that we can do it manually, if we will connect android to a computer with adb in terminal, then if we do not turn our android tablet settings on the device will not be detected and will get error message like error : device not found, do a change the settings in Settings> Developer options then enable / on button at the top right of your android tablet, checklist Android debugging to allow android debug mode.

And if the external SD card is not detected or is not mounted, you can do by using a file manager like astro and Adao file manager.

If you want to know some ROM update android jellybean release, you can bookmark or feed in a list with the following sites:

1. Cyanogenmod release Cyanogen mod 10 nightly with jellybean 4.1.2
2. AOKP release aokp_tf101_jb_build-5 with jellybean 4.1.2 / JB Milestone 1 for maguro, toro, toroplus, crespo etc.
3. goo.im Developer file hosting
4. http://forum.xda-developers.com/showthread.php?t=1562603 Android Revolution HD 12.0 Jelly Bean for htc one x
5. Android Revolution ROM
6. Team EOS Nightly builds for tf101 and another device you can find here.
7. xda-developers news and forum for android devices

Posted by: Zein Okeh Share Everything, Updated at: Monday, October 29, 2012

Script Defender 1.03 to execute scripting files


AnalogX Script Defender or script Defender is a tool to counter script that can cause the operating system to be corrupted.
This script defender can be used for windows 7, windows xp, windows vista, windows server and more.
There are files that are likely to spread the virus through the script we do not know its form. Script  defender 1.03 can prevent execute the virus script into our computer.

Many ways to block/execute the spread of the virus can occur at any time, such as using antivirus that can be optimized, but usually there is a script virus spreader that can not be blocked by the antivirus, then you need to install AnalogX script defender on your computer, it is used sparingly use the manual. That way each script virus that resides on your computer can be blocked with this free software.
analogx script defender 1.03
image source : Blog Bontang

How can we do to installing the software just click the downloaded file is sdefeni.exe. After the installation is complete then run the script defender 1.03, you can go to the start menu.
If the program is on, then you perform the initial configuration, the initialization process useful programs installed intercepts  extension file.

Script can be blocked is files like extensions files ie VBS, VBE, JS, JSE, HTA, WSF, WSH, SHS and SHB.

In addition to the above files, you can perform additional settings or files that you want the execution of its existence by the way, include the type of extension will be blocked through a list of file extensions to intercept, if all the settings are in accordance with the wishes and all the file extensions are already in your list 've been able to run more by clicking the install button intercepts. If the AnalogX script defender will displays a pop-up and gives a message that the file extension successfully included in the list. Then click the OK button to remove the message and click done to solve it.

Then you do your job as usual, and if something happens, the script AnalogX 1:03 defender to give a message, it means there is contact or a script that will run on the list. But you can choose, if you want to run the script then you simply by pressing the execute button or if you do not want to run the script click the abort button. If the script is apparently the script file disguised as a secure script, there will be a suspension or you quit while your computer and script defender would give the message to execute or abort.
You can download Analogx Script Defender 1.03 here

Reference : Blog Bontang

Posted by: Zein Okeh Share Everything, Updated at: Friday, October 19, 2012

Keyboard shortcuts in computer for facebook on chrome and firefox


As a computer or laptop user, of course in operating an application or open a browser such as facebook is we can do to shorten time without touching the mouse. A quick way to do some things on facebook with keyboard shortcuts in the computer is that you may require.

With a keyboard shortcut for facebook that can be used for firefox and chrome browser you can now use it well, so you will look like an expert in doing. From both these web browsers, there is little difference in operating it, in your chrome browser simply by pressing ALT + 1, while in Firefox you have to press ALT + Shift + 1, but of the two differences, direction and common purpose is the same opening home page, by pressing the shortcut ALT + 1 is to open or return to the home page on your facebook.

For those of you who are new you might feel a little stiff or awkward in the first use, but after a time they do you will get used. That way we do not have to bother to touch the mouse at social chat with facebook, the time required will be faster.

The following is a alt key shortcuts list on Facebook for chrome browser:

Alt+?: Search
Alt+m: Compose a new message
Alt+1: Home page
Alt+2: Your profile page
Alt+3: Friend requests
Alt+4: Your messages
Alt+5: Notifications
Alt+6: Account page
Alt+7: Privacy
Alt+8: Facebook’s Facebook page
Alt+9: Facebook Terms/Agreement
Alt+0: Facebook help center

The following is a alt key shortcuts list on Facebook for Firefox browser:


Alt+Shift+?: Search
Alt+Shift+m: Compose a new message
Alt+Shift+1: Home page
Alt+Shift+2: Your profile page
Alt+Shift+3: Friend requests
Alt+Shift+4: Your messages
Alt+Shift+5: Notifications
Alt+Shift+6: Account page
Alt+Shift+7: Privacy
Alt+Shift+8: Facebook’s Facebook page
Alt+Shift+9: Facebook Terms/Agreement
Alt+Shift+0: Facebook help center

Like facebook shortcut


Apart from the alt key shortcuts list for facebook  above, there are several other shortcuts that you can do with your keyboard, such as the tab key, this key is often used for virtually any application that lets you quickly switch between one link to another link, as well as the facebook.

And if you want to like a photo of your friends, then all you have to do is to press the L button, but before to like by pressing the L button, first you need to open the image, and then you press L, and to unlike,do the same as it did for like.

Reference : Berita Teknologi

Posted by: Zein Okeh Share Everything, Updated at: Thursday, October 18, 2012

AVG free antivirus 2013 Download for windows xp


Free AVG Antivirus 2013 for windows xp, which can be downloaded for free on the official website. AVG anti-virus is very powerful to eradicate all viruses on laptops and computers, in addition to avast and avira, avg anti-virus is also very popular and very helpful in his role.

AVG free anti virus 2013 with the latest security features and a new look, for those who never use windows 8 (retro) may already be familiar with the look of it but those who have never been this will be a new thing. Menus are contained in this new look will be clearly displayed, in terms of appearance taken from the display windows 8 but with more soft and more simple. Not only the look of the new AVG free anti-virus 2013 is accompanied by a wide range of changes and improvements to increase the performance of previous versions, including the following:
AVG free antivirus 2013 download


1. Will be lighter in running AVG, because the memory usage on windows that have been reduced.
2. Security increased detection and better than 2012 version.
3. Improved detection of viruses with services or cloud-based file reputation technology.
4. Notifications more, for a low computer or less comfortable for the notification, then we could be set to be disabled. To do this go to the menu option> advanced setting.

Apart from the four features above, avg free antivirus is also equipped with many other features, such as WIFI Guard and modules Do not track, WIFI Guard is to help computer users to avoid wifi access points in the form of hackers, who can alert the user when the computer will have access to the network. While Do not track will give you information about advertising, web analytics and social buttons that appear on the Internet which provides options to block or be monitored by the script.

Features that are not developed like AVG Link scanner been replaced by AVG Secure Search, so when there is a choice to install avg antivirus search default to be installed security toolbar in your web browser. To ensure it is not installed before you install you can chooce your curent option, and another festures might not want to install you have to select each installation on avg antivirus is the main component.

The operating system can be used fatherly to install AVG Antivirus Free 2013 is Windows XP, Vista, 7 and Windows 8 (available also AVG Free Antivirus for Linux / FreeBSD). When downloaded from the link given main AVG website, will be directed to the download site CNET.com, which only provides online (web) installer is 4 MB, so we have to be online to be able to install this antivirus. Available free trial AVG Internet security 2013.
To Download Free AVG antivirus 2013 you can follow here

Reference : Blog Bontang

Posted by: Zein Okeh Share Everything, Updated at: Wednesday, October 17, 2012

Five features of iOS 6 from More iOS 6 Development book


iOS 6 is a new operating system with many advantages and there are disadvantages too. Perhaps dozens of exciting features found in this operating system, Kevin Kim, author of More iOS 6 Development provides reviews of five exciting features that the user may not know it. Below are the five features:
iOS_6_logo
image By ThediTii source :  flickr.com

Do Not Disturb Mode
This one feature will really make you can rest without being disturbed by the sound of your iPhone. iPhone 5 will not turn on, beep or vibrate when you receive a notification, SMS message or an incoming call. In addition, you can set this feature on a scheduled basis or just turn on this feature for certain people. To run it go to Settings> Do Not Disturb.

Custom Alarm Sound
It seems like a feature that is already widely available on other phones, the iOS 6 is so, you can set the alarm clock in accordance with the ringtone or song you want.

Deleting Gmail Email
Allows you to delete the Gmail email. You can delete an email message in your Gmail account to tap and hold the icon Archive Box. After that there will be a request to remove or insert the message in the archive.

Limiting Ad Tracking
Features that would restrict an application whose function is to provide rejection of an application, so the application will not be able to send advertisement messages or the like to you. To run it, on the Settings tab, navigate to General> About> Advertising. There, you'll see the option "Limit Ad Tracking".

Emoji keyboard
To use this feature, go to Settings> General> Keyboard> Keyboards> Add New Keyboard. The next point to the bottom and look for "Emoji". Once you add this feature, the virtual keyboard will show a small globe icon at the bottom left. And there, you can use Emoji quickly.

Reference : Berita Teknologi

Posted by: Zein Okeh Share Everything, Updated at: Tuesday, October 16, 2012

Creating gif online


To create a GIF that can move, now you do not bother to install the software on your Android or computer, because now there are sites online that can create GIF online with ease to use.

This name site is Picasion, a place to make a GIF online or moving images for free and not have to bother to download the software, after we make a GIF type image, then you can upload or share to various social networks or forums do you have.

It is very easy, with 3 images are available as starters and you can add more up to 10 images, then you can upload or copy the link from another site where it is available, to be able to movement according to what you expect, we can adjust the speed of the transition on every image and image size may be set too. Available image size is 100 pixels up to 450 pixels, after once the image is ready to be make animated GIF, create animation button, and wait a few moments until the loading is complete, and then the images were ready to be shared.
Online photo edit GIF Picasion
Another advantage of the picasion site, gif image that you have created, provided links and html code to be kept in your blog or stored in bbcode for forums.

Not only that, Picasion provide other features that you can make a glitter text, create an avatar and resize the image.

Therefore you will no longer spend too much time to make animated GIF and make some avatars for your online needs, site or GIF animator image has been able to enjoy for free, and you do not need software. Picasion site is one of the many online photo editing or GIF very easily use so many of us can make a motion picture with GIF type.

For those who wanted to make a motion GIF Type image please go directly to Picasion

Reference : Berita Teknologi

Posted by: Zein Okeh Share Everything, Updated at: Monday, October 15, 2012

Dolphin Jetpack faster than chrome in android platform


Have you tried Dolphin web browser application on your iOS or Android?. Try to use it right away because Dolphin is currently the iOS and android app favorites, from the browser developers that Mobitab said this application has reached about 50 million users across the world.

For users of android platform, you can happy because the android os has developed an addon for internet access speed, the addon is called Jetpack. For iOS users you may have to patiently wait for the next launch.

Mobitab, developer apps said that the with Jetpack and using Dolphin 9.0 browser, the internet speed will be 10 times faster than the default Android browser.
Dolphin Browser android
Dolphin Browser image source : flickr.com


It can be seen from the results generated bencmark, benchmark tests are performed using HTML5test.com, there are some comparison results, Dolphin with number 480 and the chrome gives the figure was 389 and we can see a high number is better. The second test is performed on Octane bencmark application from google, the result is a Dolphin with 1394 and chrome  with 1333, Dolphin still higher than chrome. With the highest score can be said that the highest numbers is the best value. The third test performed on Sunspider, the test is inversely proportional to the test bencmark previously, the lowest value is the best value. And Dolphin generate speed at 1413.2 ms and chrome producing speed 1847.9 ms.

And the last test performed on the test Ringmark the benchmark test from facebook, with Addon Jetpack, Dolphin is succesfully achieve to a last circle and become the first place.

For that if you currently not use, try to immediately use, so that you can know more about this browser, and you can test yourself, and how the results obtained may vary with the other browsers.

Download and install the addon Dolphin Jetpack on google play or app store are available.
Reference : Berita Teknologi

Posted by: Zein Okeh Share Everything, Updated at: Saturday, October 13, 2012

Some important things to consider before ROOTING Android Phone


Has the first Android phone and new buy that can not  replace with some current ROMs that will be installed manually, and some applications may not run if our android phone has not rooting, because some of applications require to root access on your android.

Here are about some things we should consider before rooting your android phone.
Android phone Rooting
image source : flickr.com


1. Before rooting you should know a little about the workings of rooting it, and know what kind or type your android version, because not all root methods can be done for any kind of android phone, there are many different types or versions, applications will involve rooting, there are SuperOneClick, Recoveryinstaller, Nachoroot, UnlockRoot and others. Was done manually and there is also done automatically, ie, we only install apps on android phone unlock root, then run and rooting had been able to do it.

Find out in the forums that discuss about the type and version of your android phone as forumXDA , if you do not want your android damaged.

2. The difference in rooting on the Android operating system (OS)  is used, there are some applications that can only be used for rooting in a particular OS, then you should see and know the operating system used on your android phone. Each rooting can be done different ways, and some works for the Android OS. as different rooting froyo os on gingerbreak rooting for instance.

To know your Android Operating System version just open, Settings> About

3. Back up all important data on your android phone, use apps like titanium back up or back up to a computer or to the sdcard you have.

4. Be careful if you are going to start rooting, because if you are wrong it could lead to rooting your Android "brick" or can not be used anymore, but it can be fixed, as long as the brick is not too severe, as if a fatal error when rooting it will cause permanent damage .

5. Android phone that has been in rooting may no longer get a warranty from the company, and, if faulty or damaged when the rooting is done alone, it also resulted invalidate the warranty.

Therefore if you are going to start rooting, first know the result and the way it should be done. But if you've managed to rooting on your android phone and managed to install the ROM you want of course you will feel happy and some apps like superuser, you can use a terminal emulator.

Reference : Berita Teknologi

Posted by: Zein Okeh Share Everything, Updated at: Friday, October 12, 2012

Download and install Flash on android


Not just on the computer, the Flash player is important to be installed on android too, as with the flash player that has been installed on the android operating system, so if upon entrance we open the youtube video will run well.

They say that adobe will now stop to support for the Android operating system, so automatically you will not find in google play, which is a website that provides a variety of android applications. Although we could use HTML5 instead of flash still feel immature. So how to install flash player in android ?
flash-android
image source : Flickr.com

If so maybe you are interested to install flash player on android manually, here are some steps that must be run in order to use our flash running on android. But first you need to know before we are going to install flash on android :

- Find the latest flash so the problems and stability will be maintained, why do we have to look for a new flash?, cause flash that had been closed by adobe then we will not get to flash the latest updates, such as security updates, stability, and other more.

- Having no update from Adobe that will likely show up some content from browser a Flash-based , and will lead to problems for the android.

- For the installation of third-party applications, turn off the built-in security options on your android.

Once you know what might happen next in your android you should prepare is an android device with different versions of the Android operating system such as Android Froyo 2.2, android honeycomb 3.1 and jellybean 4.1, check your version of the android operating system in a way, go to Setting then About.

Are you going to continue? If you are going to continue after some consideration of all that will happen, then you are the steps below:

1. Select or checkbox that says unknown sources, if you are using Android 2.2, 2.3 or 3.x, then you can find it in Settings> Applications, while for android 4.x, can be found in Settings> Security.
2. After that, download flash for android apps here, and install it on your android.
3. To enable flash that have been installed, then you should Enable Plug-ins on your android settings, for Android 3.0 or above, Go to Menu> Settings> Advanced> Enable Plug-ins, Choose your liking such as "Always on" or " On Demand ". And to the underlying Android operating system such as Android 2.2 and 2.3, To enable "Enable Plug-ins" then you go on Menu> Settings or Menu> More> Settings.
4. Completed.

I hope this help. Or you can see the  [GUIDE] [HOW-TO] Install Adobe Flash Player on Android 4.1 Jelly Bean from XDA Forum here

Reference : Berita teknologi

Posted by: Zein Okeh Share Everything, Updated at: Thursday, October 04, 2012

Best Free Photo Editing Applications for android


The more easy to edit a photo on a smartphones are more and more ways and applications can easily to get it, paid apps and there is also a free apps, depend how we want to use the application.

Photo editing apps for smartphones are downloaded for free no less good as a paid app, the presence of photo editing application is very popular and as easy to use an instant way to generate a good photo editing. Applications for photo editing favored the first time when the iPhone was released, and the growing number of devotees when android began to tune.

Of the two types of operating system used by the user, the user's smartphone is the most widely used photo editing application at this time. Of the various existing applications most photo editing apps for smartphones and android does have good quality.

The following are some photo editing apps for smartphones below.

Application Photo edit for smartphone and android


1. Camera+

HDR Camera+


Camera+ provides an excellent feature when editing photos that will be zooming as much as 6 times. With the grid on this application so helped to determine the balance of images and object that will take a picture will be in a more appropriate position.

There are so many effects that can be used and the border that will make us a better picture. And it is easy to upload to facebook, twitter and flickr.

2. PicsPlay Pro - FX Photo Editor.

PicsPlay Pro


PicsPlay Pro Application is an application that can be used for the operating system Android users by giving 200 professional presets available, so we can use it to make us more beautiful picture quickly.
Available effect can also add diversity to edit photos like Blur, Vintage, HDR effects, black and white, with real-time opacity control. After edit the image, we can directly upload to facebook, twitter and Instagram using this application.

3. Pixlr-O-Matic


Each photo will be edit we can make it a better picture, with Pixlr-O-Matic we can edit photos with various effects such as overlay 280, nearly 200 border and 100 securities. Combine any effect on your photo so the results of the photo to be better.

4. PicSay Pro

 PicSay Pro


Different with the smartphone applications and android in general, PicSay Pro makes editing photos with the photo as in the comics, so when we are going to give a words in our pictures we can give the effect of bubbles that are useful for storing text that will we write. PicSay Pro it also can eliminate unwanted effects such as red-eye sometimes caused by a flash on the camera.

5. Filterstorm


The concept used is similar to that we usually use photoshop in computer that is the layer concept. So if we are going to edit the photo we can see the activity edit photos up to 5 layers. In Filterstorm kit can choose colors available such as brush, gradient, coloring, sketching and opacity

In addition to edit photos with a choice of colors we can also adjust the brightness or contrast of an image, exposure, saturation, to determine aspect ratio.

6. Photoshop Express

Adobe Photoshop Express


Maybe for computer users who often use photoshop feel familiar of that name, Adobe in addition to making  photoshop adobe for computer applications now create applications that can be used with mobile, smartphone.

But there is a fundamental difference that is to edit photos with Photoshop express is much easier than the computer version of photoshop. Just like the computer version of photoshop photoshop mobile version can also be used to add effects and filters to manipulate the color, crop, rotate, straighten and flip through photos.

Apart from the above six applications, there are several or even many photo editing applications that we can use. What about the six applications for photo editing that can be used on Android and the smartphone, where the best choice for use of your own. Almost all applications have features that are good us, depending on what is the best for use.

Reference : Eragadget.com

Posted by: Zein Okeh Share Everything, Updated at: Saturday, September 29, 2012
Related Posts Plugin for WordPress, Blogger...
Powered by Blogger.