Find info about electronics prices, discounts, top deals in link, like US below.
Showing posts with label Electronic. Show all posts

Nokia lumia 920 windows phone 8 review


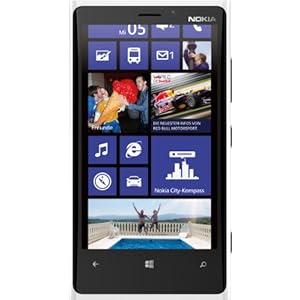
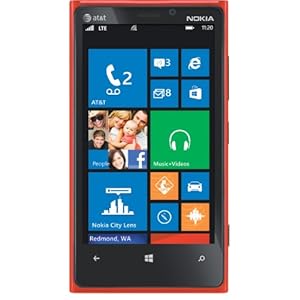
Nokia products still provide quality and extraordinary design, such as the nokia lumia 920, this phone has plenty of character and use Windows phone 8 operating system, handsets that maintain a beautiful design of the product previously the nokia lumia 900, but this handset is slightly different from the lumia 900 of a glossy windows phone 8 which has an important role for the survival of the company Nokia.

Nokia Lumia 920 is perfect as a gift for the holidays at this time, although coated with a glossy but will not easily slip in the hand and the size slightly larger than the previous handset. With a 4.5 inch screen will display the user interface perfectly with metro UI. Easy to set tiles that will suit us to setting like small, medium and large.

Nokia Lumia 920

nokia lumia 920


If we are talking about HD technology, the nokia lumia 920 has a better rate than other HD technology, nokia lumia 920 is  Puremotion HD technologically.

Viewed from the layout of each button, on the nokia lumia 920 looks very good, ranging from the headphone jack is located in the middle and holes corresponding micro speaker in place so it will be easier to listen to the music.

Designed with a unibody, which means users can not access to open the battery cover. And is available as a slot where the SIM card access, that if we would insert sim card then we have to use special tools. Regarding micro sd on nokia lumia 920 apparently does not provide for a micro sd slot, so no additional storage space.

Although only a 8.1MP camera features but using NFC technology and Pureview additional features that will be available on the nokia lumia 920.

Nokia Lumia 920 Option


nokia lumia 920 white 4g

Nokia Lumia 920 4G Windows Phone, White (AT&T)

See price here
Nokia lumia 920 windows

Nokia Lumia 920 Smartphone - Att Locked - White

Amazon.com Price : $636.18 (as of 12/09/2012 More detail)
Nokia lumia 920 black

Nokia Lumia 920 4G Windows Phone, Black (AT&T)

More detail
Nokia lumia 920 yellow

Nokia Lumia 920 4G Windows Phone, Yellow (AT&T)

More detail
Nokia lumia 920 red

Nokia Lumia 920 4G Windows Phone, Red (AT&T)

More detail

Reference : Eragadget.com

Posted by: Zein Okeh Share Everything, Updated at: Sunday, December 09, 2012

Windows 8 in tablets launched from leading vendors


After android tablet now comes with a new color, which is a Windows-based tablet. Tablet Windows 8 now is a much discussed and be an interesting conversation to discuss. There will be an interesting competition between manufacturers will release Windows 8 tablets now that Microsoft's new operating system is not monopolized by one manufacturer only. Here are some of the leading vendors are ready to launch the tablet Windows 8 several leading vendors such as Sony, Lenovo, Microsoft, Samsung, and newcomers to the tablet world is DELL.

For each manufacturer will always be homework to create a Windows 8 tablet, because now consumers are smart to choose a tablet with good specs and of course at a price that suits their pocket contents.

It is a fundamental consideration for consumers to choose a tablet with low price but have adequate Specifications.

Currently, android has a tough task to be completed, the worksheet function processing application. Reportedly Windows 8 will be able to answer a tough task, so almost any tablet with Windows 8 operating system will be equipped with a keyboard dock, so it will be easier for users to process documents / spreadsheets, such as processing data in Microsoft Office. It is only news, but it seems android also has worksheets apps similar to Microsoft Office that Kingsoft Office applications.

Here are some of the vendors that will be ready to launch Windows 8 tablets:

Microsoft Surface


microsoft windows surface

Windows 8 tablet is a tablet that comes from Microsoft itself and is ready to be marketed at a price that is quite affordable.

And certainly this tablet will be special because it will get full support from Microsoft and will be a major focus for application developers.


Acer Iconia W700 and W510


Acer Iconia W700-6607

This acer tablet has long glide in mid year 2012 ago. With a bright white color that characterizes the acer tablet windows 8 will be a formidable opponent for other vendors' products, because it has enough specs.


Lenovo ThinkPad


Lenovo tablet Windows 8 will be rolled at the official launching windows 8, with a 10.1-inch screen and HDMI port as well as a camera that will adorn the front and back windows 8 tablet's wireless display.

ASUS Transformer Book, ASUS Taichi, Asus Vivo Tab


For the third tablet will be launched on globally that means every country may soon be able to enjoy it. For that set up fund for Windows 8 tablets that will soon enliven the market and enliven the world of technology.

Samsung Ativ


Samsung has two versions of the Windows-based devices, both tablets Windows 8 and Windows Phone 8. Ativ name is the name for both gadgets windows 8 samsung and windows phone.


Reference : Eragadget.com

Posted by: Zein Okeh Share Everything, Updated at: Saturday, December 08, 2012

Cheap price Android jelly bean from asus


For those of you who are looking for android jellybean that's cheap and good quality asus ME172V might be a good choice for you.

After the success of the collaboration between Asus and Google with its nexus 7 asus now provide cheap android price but with good specs that 1GHz processor and Mali 400 GPU.
Asus google nexus 7, which previously has been launched with the operating system windows xp profesional tablet is very interesting too.

Indeed the price of asus ME172V is not expensive but the asus has not given news of her will be launched this asus ME172V, maybe the beginning of this new year. Results from GLBenchmark test that yields a low end tablet specs.
cheap asus tablet jellybean
image By vernieman on flickr.com

From the results GLBenchmark gives also the results that this Asus tablet is a tablet jellybean 4.1.1 with the resolution of 1024 x 522 even likely to increase to 1024 x 600.

The result of the specification is still known only very limited, other specifications as yet known about the core, sdcard slot or anything else related to this asus ME172V.
This news is a bit surprising addition will make a jellybean that cheap android tablet also will give employees a touch different for us who have funds that are not too large.

But unfortunately there has been no news tablet will launching, it's that we should be a little patient waiting for news of the emergence of the tablet.

Referensi : BeritaTeknologi

Posted by: Zein Okeh Share Everything, Updated at: Wednesday, December 05, 2012

Triple boot windows 8 ubuntu and android x86


Actually I have long time wanted to post how to create a triple boot between windows 8, ubuntu linux and android x86. How to dual boot or triple boot you can wear is in fact not a difficult thing you can do on your computer properly. But here I give to already know the operating system installer. And if you want to create dual booting between windows 8 and windows xp can be seen here how to dual boot windows 8 and windows xp.
triple boot operating system

Here are the steps to make your computer can use windows 8, ubuntu and android:

1. Create a partition into several sections, for windows 8 and android can be united without change, but for ubuntu to be installed on a separate partition.

Note: to install ubuntu operating system used capacity is about 3.5 gb for windows 8 about 10gb more and for android approximately 600MB. But you have to make partition more than that due in part to install multiple applications required.

2. Download the required operating system all for free.

  • Windows 8 download here
  • Linux ubuntu 12:10 here
  • Android x86 here

But I use windows 8 in different version from being downloaded, or if you already have all three of its operating system straight into the next step.

3. For the first I install Windows 8 into pc / computer with no cd or usb flash drive, if you have a cd install windows 8 with cd and can directly to the second drive, or drive D or you can install it to the first drive or drive C:. Follow all the steps involved when installing windows 8. Once the installation is finished and completed all the configuration settings, perform the next step.

4. Restart the computer and install ubuntu on drive C or drive the first or whatever drive do you want install it, for those who ever install ubuntu may be very easy, configure the settings as needed, then there'll will get some choice about windows 8 documents to import data into ubuntu, if you want to import data please tick the box parts, if not leave it blank.

5. When you have finished making install ubuntu, reboot then at the first look at boot grub2 there will be display for you to choose a system that will be used. If Windows 8 does not exist on the options add in grub2.

Go to the terminal and type the following command:
sudo gedit / boot / grub / grub.cfg "enter"
Search # # # END / etc/grub.d/30_os-prober # # # Copy and paste the text below before writing the above. or just add this below ubuntu OS

### BEGIN /etc/grub.d/30_os-prober ###
menuentry "Windows 8 Recovery Environment (loader) (on /dev/sda6)" --class windows --class os {
insmod part_msdos insmod ntfs set root='(hd0,msdos6)' search --no-floppy --fs-uuid --set=root AEC2F742C2F70D79 drivemap -s (hd0) ${root} chainloader +1
}


Edit the red text (hd0, msdos6) according to the partition windows is installed. eg windows 8 installed on partition 2 then replace with (hd0, msdos2).


6. The next step involves installing android-x86 on pc or computer.

  • Burn Android-x86 iso that has been downloaded into the hard drive or usb.
  • Restart the computer go into bios to press the delete key or F2. select the bios setting and select the first boot to usb, Save and restart, or in some cpu available directly from the keyboard to select click F9 or F11 to select the boot menu when the computer restart.
  • The first boot will look like this:
  • install android in pc booting
  • Select the bottom part of the install android
  • Select the partition to be used
  • partition android in pc
  • If you want to format the partition on the hard drive then select the format specified in accordance with the wishes of existing ext3, ext2, ntfs and fat32 and data will be lost on that partition. If you don't want formatted it's okay.
  • android in pc
  • Choose skip to not install grub.
  • grub in android pc
  • In this section select yes.
  • android in computer
  • Installation is running.
  • install android in pc
  • After the installation can choose to run android directly or reboot first.

If after the restart there was no option to enter the boot menu to android then go into ubuntu and open the terminal. Add text below into grub2 by typing "gedit / boot / grub / grub.cfg" interminal without quotes.

menuentry "Android-x86 4.0 RC2" - class android - class linux - class os {
set root = '(hd0, 7)'
linux / android-4.0-RC2/kernel root /dev/ram0 androidboot.hardware=eeepc quiet vga=788 dpi=120 i915.powersave i915downclock=1=1=2 usbcore.autosuspend SRC=/ android-4.0-RC2 /
initrd /android-4.0-RC2/initrd.img
}

menuentry "Android-x86 4.0 RC2 debug mode" - class android - class linux - class os {
set root = '(hd0, 7)'
linux / android-4.0-RC2/kernel root=/dev/ram0 androidboot.hardware=eeepc quiet vga=788 dpi=120 i915.powersave i915downclock=1=1=2usbcore.autosuspend SRC=/android-4.0-RC2 /
initrd /android-4.0-RC2/initrd.img
}

replace hd0, 7 with partitions are used as partitions if android OS used is sda3 then replace with hd0, 3.

If you're still confused can comment below.


Posted by: Zein Okeh Share Everything, Updated at: Tuesday, December 04, 2012

Asus Transformer TF101 only in apx mode wont turn on


One of the causes of android wont to turn on and always only in apx mode because the internal sdcard corrupted or the system that can handle it.

My experienced this on the asus transformer tf101, after install the jellybean rom, android can not boot. If the boot would be very long and never got into the display, booting animation that goes on. After I open the adb shell on the computer and I am backing up data on sdcard, then I format mmcblk0p *  reboot the android become wont turn on, always on the circumstances only in apx mode.

Many times I tried to start it but it still won't turn on. My Asus transformer tf101 is broken, that's my mind at that time. I've given up.


The first time I was very shocked and I think my android is broken and tf101 could not be used to fix, I was to take to the place of service, but I am curious, then i plug my android to computer and I open in terminal ubuntu and windows xp in cmd.exe then I typed in terminal lsusb and there are my android tablet on the State of apx mode, and I look in the windows device manager did in fact exist only in android apx mode.

Then I search in google one by one I open forum and tried every step in forum but there has never been a successful android still only in apx mode cannot be turned on, I followed the steps like tap the power button and the volume button down still does not want to turn on.

It was the thing to do with the way flash again with nvflash and download the firmware to suit our android official site.
easyflasher flash asus tf101
For those who use the asus transformer if the tablet in apx mode only can use the EasyFlasher, can only be used for the sbkv1 and sbkv2 versions, follow the steps below:

1. Download EasyFlasher here

2. Download the appropriate firmware with the tablet in asus official website, here

3. Save the download in a folder that is in asusupdate in folder EasyFlasher

4. Do not extract with winrar or winzip.

5. Click the button asus stock zip/unbrick, wait a few minutes

6. Once done restart the asus tf101.


Using EasyFlasher then the Asus tf101 android can be unroot  or unbrick. To pass easyflasher rooting could use as well, with the click of a button Click me on the third part with the root and add the CWM recovery with three option on the first button, as shown in the image above.

EasyFlasher on XDA Developers site here

I hope this helps


Posted by: Zein Okeh Share Everything, Updated at: Thursday, November 01, 2012

Asus tf101 problems wont boot always back to cwm recovery


It looks like my Tablet Asus transformer tf101 having problems, always go back and forth after install the bootloader and install the ROM between ICS and Jellybean in cwm recovery, but the same result, i.e. at the time after reboot the tablet back to the display of the CWM recovery, do not want to boot into Android operating system.

At first after I update asus tablet to jellybean 4.1.2, do not experience the problem and any boot smoothly, however after I install an application and I reboot, suddenly my android asus tablet  tf101 was unable to boot, boot takes a very long time, almost a few minutes and maybe if I leave it will continue to boot on the first screen animated images. After a few times I reboot and install the bootloader, kernel and suddenly got the asus transformer tablet tf101 was unwilling to boot always return to cwm recovery.
error android tablet
image by Aaronfisher1904 via photobucket.com


Then what I do is to format the data and systems sdcard through the CWM recovery 5.8.1.8 but the result remains the same, then I do Wipe Dalvik Cache, but in fact there is an error message that I got, the error is E: unknown volume for the path [/sd-ext].

Once I figure out the forums turned out this is due to the problematic volume and sdcard is corrupted, this makes me so confused because the only way is to repartition internal sdcard, with of course all the data contained in the android will be remove. Finally I found a way that is easy, and there are several ways that can be repeated without making data be deleted, however it makes me confused because of the way a little bit, But I decided to try the backup data in sdcard through ADB shell in terminal of ubuntu, and successfully, for data on sdcard is still available. For those who do not yet know how to backup via adb, try some of the following steps.

1. Download the Adb to linux or windows here
2. After download and install, plugs your android usb cable  with your computer.
3. Open terminal in ubuntu linux or cmd in windows, type ' ADB devices ' without quotation marks, to connect between your pc and android.
4. Once the devices are detected.
5. Type ' adb shell ' and typing ' cd/sdcard ' and typed ' ls ' to find out which data will be backed up.
6. backing up data in terminal or cmd and typing "adb pull /sdcard/data name /media/Data/backup", meaning /sdcard/data name is the data from android sdcard will be backed up and '/media/Data/backup' is the data storage .


Note: If after the adb shell and by typing cd /sdcard  there is no data then have to do is go back to cwm recovery android if tablet still open he cwm recovery and click install zip file and click install from sdcard and then click choose zip from sdcard, go back to terminal or cmd in computer, and type adb shell cd /sdcard/ -> ls, see if there is still data in the sdcard, if no then it is likely the data on sdcard is erased.


After that to perform partition on your android tablet after installing cwm recovery v 5.8.1.8 do the below.

1. Push the power button and the volume down simultaneously for about 10 seconds
2. Select advanced then select Partition SD Card
3. For the 16 GB select the 1024M i.e. 1 GB ext.
4. for Swap size you can select 0 m or whatever, wait a few moments and then reboot


If after the reboot the android is still the same result, for the asus transformer with the tf101 sbk1 and sbk2 could use easyflasher, to download easyflasher can visit  xda developers site here.

Posted by: Zein Okeh Share Everything, Updated at: Thursday, November 01, 2012
Related Posts Plugin for WordPress, Blogger...
Powered by Blogger.