Find info about electronics prices, discounts, top deals in link, like US below.
Showing posts with label Windows vista. Show all posts

How to install android sdk ubuntu and windows


Actually I just wanted to give you a little tutorial or how to install android sdk on your pc or laptop with ubuntu os, but the same might as well install android sdk emulator on your computer or laptop pc with windows os like windows xp, windows 7, or Windows 8 as do almost the same and little disparate.

In android sdk we can use whatsapp application or WeChat on a computer with the help of this emulator android sdk installation, and if your computer is connected to the Internet then the android sdk emulator has been able to connect to the internet without any setting.
android sdk emulator ubuntu

* How to install android sdk emulator on ubuntu:


1. Install Java or OpenJDK on your ubuntu.

Open synaptic package manager or ubuntu software center and type "OpenJDK" without quotes then there will be available in accordance with the OpenJDK version of ubuntu 10.04 ubuntu instance it would appear OpenJDK 6 right-click and mark for install. Wait until the process is complete. To install openjdk-7 see here
In terminal :
#sudo apt-get install openjdk-6-jre

2. Download the Android SDK emulator here.

3. Extract the Android SDK has been downloaded into documents or anywhere up as needed :).

4. Open terminal by pressing CTRL + ALT + T or click Applications -> Accessories -> Terminal. Typing sudo su and enter your password.

5. Navigate your terminal to the android sdk folder. For example, if the Android SDK folder located in Documents then follow these steps:

  • cd Documents --> cd android-sdk-linux -- > cd tools --> ./android
  • So do not want typing like the above do as follows:

    - Open a terminal its way as the No. 4 typing "gedit ~ /. Bashrc" without the quotes and enter the text below at the very top and then save.
  • #AndroidDev PATH export PATH=${PATH}:/home/???/Documents/android-sdk-linux/tools export PATH=${PATH}:/home/???/Documents/android-sdk-linux/platform-tools
note:the name of the red "/ home /??? / Documents / android-sdk-linux / tools" and that the second is the folder where I store the android sdk. Adjust to the folder where you saved.- Still diteminal the following command "gedit / etc/udev/rules.d/51-android.rules" without quotes and input the text below ".

SUBSYSTEM=="usb", ATTRS{idVendor}=="0bb4", MODE="0666"

SUBSYSTEM=="usb", ATTRS{idVendor}=="0502", MODE="0666"

SUBSYSTEM=="usb", ATTRS{idVendor}=="12d1", MODE="0666"

SUBSYSTEM=="usb", ATTRS{idVendor}=="1004", MODE="0666"

SUBSYSTEM=="usb", ATTRS{idVendor}=="22b8", MODE="0666"

SUBSYSTEM=="usb", ATTRS{idVendor}=="04e8", MODE="0666"

SUBSYSTEM=="usb", ATTRS{idVendor}=="0fce", MODE="0666"

SUBSYSTEM=="usb", ATTRS{idVendor}=="0489", MODE="0666"

SUBSYSTEM=="usb", ATTRS{idVendor}=="18d1", SYMLINK+="android_adb", MODE="0666"

SUBSYSTEM=="usb", ATTRS{idVendor}=="04e8", MODE="0666", GROUP="plugdev"

To install the android sdk at the root can be viewed of the source ubuntu comunity here.

Then save and reboot or restart your laptop or computer. So that when you open the android sdk does not necessarily have to enter the android sdk folder on terminal. simply by opening a terminal and sudo password and then android sdk android in laptop or pc you'll leave.

6. Open a terminal and typing sudo ubuntu android then enter your password.

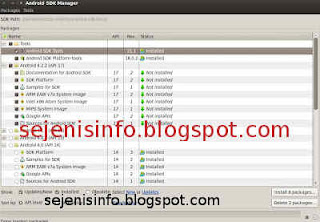
7. After the android SDK emulator appears and then select the check tools and android files that get installed like in the picture below.
android avd emulator ubuntu

In the picture above I did install android 4.2 version and you can choose the version that will be installed android as android ICS, android honeycomb etc as you wish. At the bottom of the Extras folder with writing a check Android support libraries, Google play service, Google usb driver and so adjust it with the needs.

8. Click the install packages and licenses accept check, wait a while until installation is complete.

9. After install android sdk on PC or laptop is complete then click the Tools button located at the top left after the packages.

10. After the new window appears select the window or click the Manage button AVDS ... and click the New button on the right existing, well here you can choose your favorite android version there is a 10 inch size to a small size, select the size of the 7-inch or 5 inch that if the computer or laptop has a less specs computer so you are not too hang up or heavy and lag.

11. A new window will appear when the button is clicked and a new Insert your name free android for example name is androidku, android select your choice according to size preference. If you want to change the size of the internal memory replace it from 200 to 512 for example, and the contents of sd card to 1024 = 1GB and click OK.

12. If it is then in view avd there will be a new menu that has been created is androidku. Click start to open its android os android will appear according to your choice.

* To install the Android SDK on windows is the same way.


1. Download and Install the java application here.

2. Android Download for windows here.

3. Install android sdk on windows and if it is open android sdk installed and did his manner as above at the start of No. 7.

Video how to install android sdk emulator on pc or laptop


Posted by: Zein Okeh Share Everything, Updated at: Monday, May 06, 2013

How to know windows version installed


Computer or laptop which already windows installed either windows xp, windows 7 or windows 8, perhaps we do not know which version of Windows that is used on our pc. There are many versions of windows like windows xp service pack 1, windows xp sp2 and also on windows xp sp3 there are several other versions as windows xp for gaming, windows xp media center, windows xp home edition, or windows with x32 or x64 bit etc..

If I could mention one by one until dawn :). Our PC has installed the windows being installed by others of course we do not know the most likely version is used, the following well below I will give a little info about how to know which version of Windows that is used in your computer or laptop.

How to know the version of windows on windows xp and windows 7:

In windows to know which version of Windows that is used almost same way, but not nearly but thats same way.

1. If its on the desktop or on the main screen there is icon my computer, just right click mouse on my computer icon and click properties that its.

2. If the My Computer icon on the main screen or on the desktop it does not exist then the way we use open windows explorer then right click the mouse and then click properties.
See the example image below.

how to know windows version


Display system properties windows xp deluxe version.
system properties windows


3. If you want to see the whole system including the use dxdiag version used then use the following:
- Click start and click run.
run button windows


- Typing "dxdiag" without quotes, then enter will be out the display as shown below.
dxdiag windows xp deluxe


For his appearance may vary slightly depending on the theme used.

How to know windows 8 version:
For an extra little info for those who may be new including my first time on using windows 8, may be will confused to looking for run and to run some command like cmd, dxdiag etc..Here a little info to find it:

1. Open windows explorer.
2. Right click mouse button and select Properties.

How to enter to run in Windows 8:

1. Move the mouse to the right monitor, will be out a menu.
windows 8 menu


2. Select the top menu the search menu and typing cmd.
windows 8 search command run dxdiag

If you want to open cmd as adminitrator just right click your on cmd icon and see on your screen below that will appear the options.


Posted by: Zein Okeh Share Everything, Updated at: Sunday, May 05, 2013

Script Defender 1.03 to execute scripting files


AnalogX Script Defender or script Defender is a tool to counter script that can cause the operating system to be corrupted.
This script defender can be used for windows 7, windows xp, windows vista, windows server and more.
There are files that are likely to spread the virus through the script we do not know its form. Script  defender 1.03 can prevent execute the virus script into our computer.

Many ways to block/execute the spread of the virus can occur at any time, such as using antivirus that can be optimized, but usually there is a script virus spreader that can not be blocked by the antivirus, then you need to install AnalogX script defender on your computer, it is used sparingly use the manual. That way each script virus that resides on your computer can be blocked with this free software.
analogx script defender 1.03
image source : Blog Bontang

How can we do to installing the software just click the downloaded file is sdefeni.exe. After the installation is complete then run the script defender 1.03, you can go to the start menu.
If the program is on, then you perform the initial configuration, the initialization process useful programs installed intercepts  extension file.

Script can be blocked is files like extensions files ie VBS, VBE, JS, JSE, HTA, WSF, WSH, SHS and SHB.

In addition to the above files, you can perform additional settings or files that you want the execution of its existence by the way, include the type of extension will be blocked through a list of file extensions to intercept, if all the settings are in accordance with the wishes and all the file extensions are already in your list 've been able to run more by clicking the install button intercepts. If the AnalogX script defender will displays a pop-up and gives a message that the file extension successfully included in the list. Then click the OK button to remove the message and click done to solve it.

Then you do your job as usual, and if something happens, the script AnalogX 1:03 defender to give a message, it means there is contact or a script that will run on the list. But you can choose, if you want to run the script then you simply by pressing the execute button or if you do not want to run the script click the abort button. If the script is apparently the script file disguised as a secure script, there will be a suspension or you quit while your computer and script defender would give the message to execute or abort.
You can download Analogx Script Defender 1.03 here

Reference : Blog Bontang

Posted by: Zein Okeh Share Everything, Updated at: Friday, October 19, 2012

AVG free antivirus 2013 Download for windows xp


Free AVG Antivirus 2013 for windows xp, which can be downloaded for free on the official website. AVG anti-virus is very powerful to eradicate all viruses on laptops and computers, in addition to avast and avira, avg anti-virus is also very popular and very helpful in his role.

AVG free anti virus 2013 with the latest security features and a new look, for those who never use windows 8 (retro) may already be familiar with the look of it but those who have never been this will be a new thing. Menus are contained in this new look will be clearly displayed, in terms of appearance taken from the display windows 8 but with more soft and more simple. Not only the look of the new AVG free anti-virus 2013 is accompanied by a wide range of changes and improvements to increase the performance of previous versions, including the following:
AVG free antivirus 2013 download


1. Will be lighter in running AVG, because the memory usage on windows that have been reduced.
2. Security increased detection and better than 2012 version.
3. Improved detection of viruses with services or cloud-based file reputation technology.
4. Notifications more, for a low computer or less comfortable for the notification, then we could be set to be disabled. To do this go to the menu option> advanced setting.

Apart from the four features above, avg free antivirus is also equipped with many other features, such as WIFI Guard and modules Do not track, WIFI Guard is to help computer users to avoid wifi access points in the form of hackers, who can alert the user when the computer will have access to the network. While Do not track will give you information about advertising, web analytics and social buttons that appear on the Internet which provides options to block or be monitored by the script.

Features that are not developed like AVG Link scanner been replaced by AVG Secure Search, so when there is a choice to install avg antivirus search default to be installed security toolbar in your web browser. To ensure it is not installed before you install you can chooce your curent option, and another festures might not want to install you have to select each installation on avg antivirus is the main component.

The operating system can be used fatherly to install AVG Antivirus Free 2013 is Windows XP, Vista, 7 and Windows 8 (available also AVG Free Antivirus for Linux / FreeBSD). When downloaded from the link given main AVG website, will be directed to the download site CNET.com, which only provides online (web) installer is 4 MB, so we have to be online to be able to install this antivirus. Available free trial AVG Internet security 2013.
To Download Free AVG antivirus 2013 you can follow here

Reference : Blog Bontang

Posted by: Zein Okeh Share Everything, Updated at: Wednesday, October 17, 2012

Ways to securing your computer system from hacker


There are several factors that can lead to compromised securing of computer systems, among which the development of a virus that will cause the computer system to be failure.
And with the development of technology the world now use the computer as a communication to online banking, social networking and online shopping. For it is the easier of the hackers and crackers as spammers can attack anytime on your computer system.

Hackers can stolen our personal data such as emails and other important data. For that we need a few countermeasures in order to keep your computer system safe from hackers and crackers. Here are simple steps that you can do on your computer system.
Secure Computer
image source : Flickr.com
1. Important data such as personal information had to be backed up at any moment and store it separately from the computer you normally use to open the email, social network and online shopping.

2. For computers that are often used for internet browsing software to install a good firewall, so viruses, worms, malware, trojans and adware will be difficult to penetrate the wall.

3. Using the browser, you should always take a look at whether they are in a state of optimum safety as email settings to keep spammers.

4. Operating systems, software and web browser you use should be kept up to date, frequent updates to the third circuit, the point to make them thicker than hacker attacks etc.. For users of Windows OS update by visiting windowsupdate.microsoft.com and for users of office visit officeupdate.microsoft.com latest patches and updates from it.

5. Boot disk is important, then you create a boot disk on your computer using a usb drive, so if there is damage to your computer operating system you just open the first with a boot disk.

6. Install anti-virus and setting the automatic updates so that updates to anti-virus will always receive the new version.

7. Be careful to incoming email and you do not know, because if we open the email could happen that email is a virus spreader.

8. There are some programs of unknown origin, the program can be a funny story or a joke, It can contain a Trojan horse in it and if you spread to multiple computers like kekomuter friend trojan horse virus then it will attack the computer in question.

9. Always turn off your computer when not in use, so your computer will be free from attacks by hackers, because hackers now can not penetrate the dead computer.

10. File name extension must remain disabled, this is usually the windows operating system by default is set to hide file extensions.

Posted by: Zein Okeh Share Everything, Updated at: Thursday, September 27, 2012

Windows Media player Corrupted


Windows that had long been abandoned and we never maintenance, and we never check the files may have been corrupted like this one.

How do I fix the Windows Media player has corrupted? Maybe some people asking like that, if Windows Media player will be damaged. Windows Media player is a popular application is the default Windows application. Windows Media player is usually used to play a song or video in Windows. OK here's how to disable and repair the Windows Media player.

To disable the Windows Media Player follow these steps

- Click on the Start button and go to Control Panel
- Open the Sound and into the Playback tab
- Now double click on Speakers / Headphones and click on the tab enhancements
- Select the Disable all enhancements
- Click OK and finish

To fix it you can download and install Windows Media Player to the latest version. The damage usually occurs because there is an error in your windows registry.
Source / Reference : Blog Bontang

Posted by: Zein Okeh Share Everything, Updated at: Tuesday, August 14, 2012

How to optimize your ram computer or laptop


Lot of ways to optimize the ram on the computer or your laptop. There are applications that can speed up your computer in a way that is so easy.

One of them is RAMrush. RAMRush is a tool for management memory for windows. RAMRush can optimize memory usage on Windows Operating System and also free up RAM Physical, make your PC work faster.

This tool runs from the system tray. In addition to optimize memory, RAMRush size is very small and easy to use. RAMRush also be used to prevent system crashes, memory leaks and keep your computer running more efficiently.

With RAMRush you can see how the use of CPU and RAM Memory is running. And how to begin to optimize ram on the computer / laptop?, for begin to starting optimize you simply press on the option "Optimize Star" on the tool RUMRush. Or it could be with Hot key, this tool by default HotKey is Ctrl + ALT + O.

Ram optimizer rush tool

Key Features RAMRush

* Increases the system performance
* Increase the amount of available memory
* De fragment the physical memory system
* Recover Memory from Windows applications
* Remove memory leaks
* Prevent system crashes caused by memory problems
* Displays real-time data using the CPU and RAM
* Hotkey to perform optimization
* Click to perform optimization
* Quiet mode in the Windows tray
* Auto Optimize mode support
* Command line mode support (eg: 'PATHOFRAMRUSH / RAMRush.exe-AutoOptimize')

Supported on Windows 98, Windows ME, Windows 2000, Windows XP, Windows 2003, Windows Vista, Windows 2008 and Windows 7.

Download RAMrush here..

Reference : Dede Purnama

Posted by: Zein Okeh Share Everything, Updated at: Monday, August 13, 2012

How to repair rundll32 error


Your computer may have problems with rundll32.exe is error, using windows xp, windows 7 and vista could this happen often, especially for users of Windows 98 but I guess now rarely use windows 98. how to fix rundll32? before take up this let us know about the windows rundll32.exe in advance.
windows system rundll32 error

Rundll32.exe is part of Windows OS are responsible for running the DLL and put libraries in memory. Rundll32.exe process is known as a command line utility programs, and perform its function is integrated along with the rundll.exe file. Rundll32.exe works by applying a function exported from a specific DLL module is 16bit or-32-bit. Rundll32.exe is the process of development of the Run DLL.

Rundll32.exe is a function of internal program used by Windows to run other programs that have not been known internally as a DLL (dynamic link libraries) are required by the operating system and your programs (eg Word, Outlook, Internet Explorer, OpenOffice, Thunderbird , Firefox, or whatever in order to function). Such programs are charged to the DLL into memory and under and then trigger certain functions from the DLL module.

Why Rundll32.exe error?
Rundll32.exe error on usually occurs in response to the inability to access Windows applications, programs or files as a result of a file (Dynamic Link Library) is damaged or lost or in response to the virus rundll32.exe designed to look like a Windows process which normal. Another cause of damage is due to rundll32 install and uninstall process is not so perfect that cause system crashes.

How to fix Rundll32.exe Errors ?
There are several ways that can be taken to repair this damage;

A. Automated with software. An easy way to fix this is to use a software called RegCure Registry Cleaner. Unfortunately the software is paid and I think you will definitely avoid this.

2. By manual means, ie by doing some remedial measures.

3. If it is clogged, the last way is to install repair or install completely.

How to Fix the "Windows Can not Find C: WindowsRundll32.exe" Error ?

A. Sometimes when the rundll32.exe file is lost, corrupted or virus infected, you may get a message like this: "Windows can not find C: WindowsRundll32.exe. Make sure you typed the name entered correctly and try again ".

2. First of all, scan your computer with a reliable antivirus program to get rid of any virus infection that might be found. However, if a file is missing or corrupted Rundll32.exe which is causing the problem, first try to find the rundll32.exe file in the folder C: windowssystem32dllcache. If it's still there, please copy and move them to the location C: Windowssystem32.

3. If the dllcache folder does not exist, please look in C: WindowsSericePackFilesi386 and copy to the above is what I mean.

If the 3 steps above still fails, do the following process;

A. Insert the Windows installer disk into the CD / DVD ROM drive.
2. Click [Start] and select [Run ...].
3. Type: [expand f: i386rundll32.ex_ c: windowssystem32rundll32.exe] in the Run box was then press [Enter], then the copying process will run an
4. After the 3 above is complete, reboot your computer and test results.
5. Process is completed and the problem should be solved.

Note:
A. Sometimes when a virus infected file rundll32.exe, it would not shutdown computer. To fix is ​​you must delete the  rundll32 file is infected with a virus and then copy back of the cd installer.
2. Should be completed after the second way above, then the problem goes away. But if for some reason is not well done, then it follows the path that can be taken is to install repair or installation of a total system operation.
Reference [source]

Posted by: Zein Okeh Share Everything, Updated at: Wednesday, February 08, 2012

How to stop windows updates windows xp and vista


When we use the internet with a slow speed connection that we should turn off automatic updates windows xp, vista etc, because it can be the cause of the speed of the Internet becomes more slow.

Automatic updates will be downloading the latest system from Microsoft that the results will be installed into the Windows system. if we do not need it so we can disable the windows auto updates.

how to stop windows update windows xp:
1. Go to control panel.
2. Double click in the system.
3. Go to the Automatic updates tab.
4. Chooce Turn  of automatic updates in the option.
turn of automatic updates windows xp
Image [source]

how to turn of windows updates windows vista :
how close to the windows xp we can see illustrated below
turn of automatic windows updates windows vista
Image [source]

Posted by: Zein Okeh Share Everything, Updated at: Wednesday, February 01, 2012

Change startup programs windows 7,xp,vista etc


how to customize the startup programs windows 7, XP,vista etc. on this opportunity I tried to give a tips to remove windows startup programs, change windows start up programs or disable startup programs in windows 7, xp, vista etc.

Many current applications or software that runs some of their components at any time the computer is turned on, whether the program is being used or not. These components will be incorporated into the Windows Startup so that they run every time you turn on your computer without your permission. All programs are consuming memory, CPU load time, and other resources and can significantly slow down or even make your system crash. To speed up your computer, you should disable or turn off unnecessary programs when the computer startup.


How Can I Disable Programs From Windows Startup?
There are many ways to prevent the program to not run at startup. Some common methods are listed below.

Method 1: Configure Windows Startup Folder for Windows 95/98/Me/XP/Vista/7
You may find some program shortcuts if you go to (Start - Programs - Startup) or (Start - All Programs - Startup). Program these shortcuts will run at startup. Just delete the shortcut that you do not want running at startup.
startup program windows 98
Image source : computer how to
Right click the program you with to delete, and click delete
- Win9x/98/Me – C:\Windows\Start Menu\Programs\StartUp
- WinNT/2K – C:\Winnt\Profiles\All Users\Start Menu\Programs\StartUp
- WinXP – C:\Documents and Settings\All Users\Start Menu\Programs\Startup

Method 2: Using the System Configuration Utility (msconfig)
The easiest way to access MSCONFIG is by going to "Start", then type msconfig (for windows 7 and Vista) For Windows XP (Start - RUN - MSCONFIG and then click enter).
disable startup program windows 7,xp,vista

Further Under the Startup tab there is a list of all programs that start in the Windows Registry. Simply uncheck the programs you do not want to startup when windows starts up. Once you make your selection, click Apply and Ok.

Some startup programs may be important, such as antivirus and some programs that really work when the computer starts up. Reference[Dede purnama]

Posted by: Zein Okeh Share Everything, Updated at: Tuesday, January 31, 2012

how to fix missing file DLL extensions


As a computer user with operating system windows, there are times when the windows were containe by virus and wether we are always using the internet and often enter the flashdisk that might be exposed to the virus. With antivirus contained in our computers that do not have the ability to fix it.
fixer missing files DLL

So the operating system like windows xp, 7 and vista are susceptible to the virus because it has an antivirus that is not so good, it will cause some loss of extension files that are important to the windows as a DLL file extensions.
The loss of some DLL files will cause the operating system unbalance and will cause some applications not working properly. This certainly will make us a little dizzy because the applications that we use can not we used.

What does dll mean?

Dynamic Link Library

Why do my dll-files suddenly disappear?

Dll-files are usually used by a lot of different programs. Then when you remove the program using an uninstall utility, it removes all files it installed during the installation progress and also the dll-files used by the program that are also used by other programs.

To Fix Missing DLL file this we can use a tool or software that can fix this would problem. One tool that we can use with a DLL-files.com Fixer, this tool can Automatic fix DLL files error.

Below are some benefits to be gained by using this tool:

DLL-files.com Fixer Benefits

  • Optimize your registry with simplicity and ease.
  • Defrag your Windows® registry with one simple product..
  • Fix all your DLL file problems at once and maintain an error-free Windows registry.
  • Stop your applications and PC from crashing.
  • Prevent the unwanted popups from appearing over and over.
  • Improve PC performance and operating system response time.
  • Speed up operating system performance.
  • Repair and clean your registry of unwanted and invalid registry entries.

How do I install the dll-file I've downloaded from DLL-files.com?

Use an application to unzip the DLL file you download from DLL-files.com and extract it to your system directory. By default, this file is located here:
  • Windows® 95/98/Me: C:\Windows\System
  • Windows NT/2000: C:\WINNT\System32
  • Windows XP, Windows Vista, Windows 7: C:\Windows\System32
If you use a 64-bit version of Windows, you should also place the file in C:\Windows\SysWOW64\
The other option is to upload the DLL file directly to the program that is asking for the file. If this doesn’t immediately solve the problem, you may need to use regsvr32 by the following way:
  1. Open Windows Start menu and select "Run..."
  2. Type CMD and press Enter
  3. Type regsvr32 "filename".dll and press Enter
Download tool here

Posted by: Zein Okeh Share Everything, Updated at: Sunday, January 15, 2012

Free hard disk recovery software for windows and linux


Hard disk or commonly known as the hard drive is a device that is very important to us as computer users.
With hard disk  all the important data we can keep it safe, but there are times when your hard disk will be damaged, either intentional or unintentional, such as hard drives in accident format, data is erased by others, or it could be our hard drives exposed to the virus so that important files are missing.

So how recover data from hard disk? This is a thing that people often questioned! but not many people know the existence of free hard drive recovery software on the internet, those who do not want to try and just rely on a service place to do it. In fact we can do at home with software available that can be downloaded via the internet, such as the Free Data Recovery Software - EASEUS Data Recovery Wizard ®, software that can make the harddrive restore all the lost files, formatted and erased.

free recovery hard drive software easus
Free and easy-to-use data recovery software

Free and powerful data recovery software to recover 1 GB data free of charge. It solves all data loss problems - recover files emptied from Recycle Bin, or lost due to software crash, formatted or damaged hard drive, virus attack, lost partition and other unknown reasons under Windows 2000/XP/2003/Vista/2008 R2 SP1/Windows 7 SP1. It recovers data from formatted partitions with original file names and storage paths. Moreover, the free data recovery software works well with dynamic disk, RAID and EXT2/EXT3 file system,  Recover deleted or lost files emptied from the Recycle Bin.
   

Advantages over other free data recovery software:
  • Recover files from formatted partitions with original file names and storage paths.
  • Recover data from lost/deleted partitions.
  • Recover data from dynamic disks. 
  • Get back files after a partitioning error or hard disk crash
  • Get data back from RAW hard drives
  • Recover from hard drive, USB drive, memory card, memory stick, camera card, Zip, floppy disk or other storage media.
  • Recover from Linux file system under Windows.
  • Recover office document, photo, image, video, music, email, etc.
You can visit the download site here

    Posted by: Zein Okeh Share Everything, Updated at: Thursday, January 12, 2012

    How to Make usb bootable windows 7, vista


    A little problem for the user netbook is if we want to reinstall windows 7 or vista there is no dvd rom to install it. But netbooks have a usb plug for you, for new user who do not know how to reinstall windows 7 or windows vista on a netbook or notebook there have not a dvd rom.

    Lots of software providers to do so, such software on this one. SetupFromUSB. This software is free to download and easy way to use it.

    In previous posting i write about how to make bootable with winusbmaker software, you can visit in make a bootable usb windows 7 with winusb maker.

    based on the reviews of this software from sourceforge.net Recommendation 70% of it.
    one of them said their review: Awesome program! I just need a program to write the image file to a flash drive directly from a disc. But is seems a it has some compatibility problems, cause when i exit it Windows notify me whether this program is working correctly.

    Description

    This utility would convert your USB flash drive into Windows Vista or Windows 7 bootable setup disk. You can Make your USB drive as bootable and setup of Windows Vista or Windows 7 on any computer That supports booting from USB.

    Features

    • Setup Windows Vista and 7 from your USB disk.
    • No more CD / DVD required for setup.
    • Best option for Netbooks.
    • Reduce your setup time.
    • Use External USB HDD as Bootable Setup Disk with v2.0.0.0
    • No need to format the disk each time.
    Step to create a bootable usb, but for to do it we must have a computer or laptop that has DVDROM  or image files of windows 7 or vista that have been converted into image files, to install windows to the FD.

    1. Prepare flash +-4gb
    2. Download software setupfrom USB  here.
    3. Install Setupfromusb software to your computer
    4. Run the program Setupfromusb.
    5. Select the source file that contains windows 7 or windows vista you are save, for example in the DVDROM.
    usb bootable setup from usb select source

    6. Then select the destination drive to store files windows to Flashdisk.
    Note 'Previously stick must be clean of data is important because during the process will erase all data from flash'
    setupfromusb destination drive

    7. Check for the red text to continue.
    procces setupfrom usb bootable windows 7


    8. While a procces wait a few moments.

    After the process is complete then the flash drive was able to reinstall windows in accordance with what we input into the flash.
    reference [http://sourceforge.net]

    Posted by: Zein Okeh Share Everything, Updated at: Wednesday, January 11, 2012

    Forgot Windows XP Password ?


    Forgot Windows XP Password? Ways to Find Windows XP Password

    By Daphne Angel

    Question: I forgot my Windows XP Password and now I am locked out of my computer, is there any way to find My Windows XP-based computer cryptogram?

    Answer: Don't worry - if you forgot Windows XP password, there are many methods you can used to find a Windows XP-based computer cryptogram.

    Method 1: Try To Guess your forgotten Windows XP Password.

    Don't laugh! You'd be surprised how often this works. So, before you jump into any high tech windows password recovery solutions, try your hardest to remember what your forgotten cryptogram may have been. Most passwords, even complicated ones, are often tied to common things in our life, such as people, places and things in our personal and professional lives.

    Could your forgotten cryptogram have had anything to do with?

    1. Your name or the name of your friend or family member?
    2. Your birthday or your loved one's birthday?
    3. Your home or office address?
    4. Your lovely pet's name?
    5. Your favorite food?
    6. A frequently dialed telephone number?
    7. A combination of any of the above?

    Method 2: Use Your Windows Password Reset Disk
    Assuming you were proactive and created a password reset disk at some point in the past, use it at the XP logon screen to change your cryptogram. Your password reset disk will still work even if you've changed your Windows XP cryptogram since creating the disk. Follow these steps to reset the forgotten cryptogram.

    Step 1: Click use your password reset disk. The Password Reset Wizard starts. The Password Reset Wizard allows you to create a new password for your user account. Then click Next.

    Step 2: Insert your password reset disk into drive A, and then click Next.

    Step 3: Type a new code in the Type a new password box, then confirm the password. Click Next.

    Method 3: Have Another User Account With Administrator Privileges

    If you have other user accounts on your computer, one of them may be setup with administrator level access. This means that you can log on with this account to change your forgotten cryptogram.

    Method 4: Hack Your Windows XP Account With Windows Password Recovery Program

    If you still can't find your forgotten XP password from the above methods, then it's time to try something a bit more technical. password recovery tools are software programs designed to recover or reset a lost/forgotten Windows password. They are considered as the best password recovery solution. Here take Windows Password Recovery 6.0 as example.

    You can find forgotten XP password with 3 easy steps:
    Step 1: Download and install Windows Password Recovery 6.0

    Step 2: Burn windows password recovery 6.0 to CD/DVD or USB Flash Drive

    Step 3: Reset your forgotten cryptogram

    Method 5: Still Can't Find Your forgotten XP Password?

    If you still can't find your forgotten XP password, even after using the Windows password recovery programs linked above, you will need to perform a clean install of Windows system which will erase everything on your PC.
    Related Articles: http://recoverlostpassword.com/article/forgot-windows-xp-password.html
    If you forgot Windows XP password, there are many methods you can used to find a forgotten Windows XP password.

    Article Source: http://EzineArticles.com/?expert=Daphne_Angel
    http://EzineArticles.com/?Forgot-Windows-XP-Password?-Ways-to-Find-Windows-XP-Password&id=6017954

    Posted by: Zein Okeh Share Everything, Updated at: Wednesday, December 21, 2011

    Why Windows Vista Freeze ?


    Why Windows Vista Freeze?

    Author: Monica Koudstaal

    The article describes the reasons that cause Windows Vista to freeze during startup, shutdown etc. The information compiled here is simple and reliable. However, it is recommended that any method described here should be followed correctly to avoid facing problems. This will save time and money of users who would otherwise spend these resources looking for Microsoft Windows Vista support or Microsoft product support options
    Windows Vista has not been able to create itself a niche like its predecessor Windows XP (still the most widely used desktop operating system in the world) and successor Windows 7, the most stylish and high-performance OS from Microsoft. Windows Vista has far more earned a bad name for its shortcomings and problems than for the good performance and friendly use.

    Windows Vista freezes frequently irrespective of the sufficient memory amount, error-free hard disk, and no viruses on the computer among other things. Users often feel deluded about these computer problems and try to search for alternatives to fix them. You must first understand your system and then should rummage around for solutions. Let's understand what can cause your vista to freeze and not respond at all.

    Faulty Memory Stick
    A damaged\faulty RAM (memory) stick can prove to be the cause of freezing problem in your Vista computer. You must run a memory diagnostic test to check whether the RAM is working fine or not. If it is faulty, replace it with a new stick. You can run a memory check using an online tool or download and install a free or paid program.

    These programs include Microsoft's free Windows Memory Diagnostic, Memtest86 (free), DocMemory Memory Diagnostic (free), and M2K MemScope (free) among others. You can also choose to run the built-in Memory Diagnostic Tool in Win Vista. This will require you to insert your original Windows Vista installation media into the drive and follow the instructions to reach the tool. If you never did, then you must now do verify that your computer meets the minimum hardware and software requirements for Win Vista installation.

    Hardware Changes
    If you recently added a new device to your computer like a mouse whose software was not installed and configured properly, Vista will obviously throw tantrums. You might not come to know about the behavioral change until a day or two passes. The mouse might work on the very day and time when it was installed, but it might not work after you turn off and on your PC next day.
    Mouse was just an example. It could be any device like printer, router, TV, or gaming console among others. If you made any such hardware change, then undo the changes and recheck whether the OS works fine or not. If it does, then reinstall and reconfigure the hardware and its related software applications. You must also ensure that the hardware drivers are updated and are compatible with Vista. If you need help with driver applications, either visit the official website of hardware manufacturer or Microsoft.

    Software Changes
    If you installed any new program like anti-virus or video calling (like Skype) software and started experiencing problems afterwards, it indicates that the problem likely occurred due to such change. Try uninstalling and then reinstalling the program from scratch. Use the user manual or online instructions to make sure that it is installed properly. Since installation of any program is a sensitive part, minor mistakes do create havocs and cause discomfort.
    Other than these, if you uninstalled any program whose remnants are still in your computer, Vista would not function well. Whenever, any program uninstalled, its registry entries and DLL files remain presented in the system. You must locate and remove these files and entries to fully uninstall the program. The empty registry keys and values cause problems in a computer. You must run a registry cleaner to clean these keys and prevent your computer from being clogged. Take help of an expert if you feel that you won't be able to locate these files by yourself.

    Startup Programs
    When Win Vista starts, it starts with many default and/or third-party startup programs, applications. These make your system perform slow and even freeze in most of the cases. To avoid this problem, disable those programs that were never in use and will never be used. Click on the Start menu and type ‘msconfig' (without quotes) in the Start Search box. Hit Enter on the keyboard.
    This will prompt open the System Configuration window. Highlight the Startup tab in the window and search through all the programs. Locate those programs that you never use and uncheck the boxes next to them. When done, click on the Apply button and then OK to exit the window. When prompted with a message, click on the Restart button. When the computer has restarted, you will see a message like Windows has blocked some startup programs. Usually, most of the programs can be disabled except anti-virus applications and firewall programs.
    Article Source: http://www.articlesbase.com/operating-systems-articles/why-windows-vista-freeze-5454668.html
    About the Author

    V tech-squad Inc. is the leading third-party service provider of certified online technical support services. Our top-class services include Microsoft Product Support, antivirus issues, malware issues, spyware issues, wireless router issues, printer issues, and non-computer devices etc. If you are looking Windows Vista Support then you can reach V tech-squad Inc. online technical support at their Toll Free No +1-877-452-9201 For US/CA.

    Posted by: Zein Okeh Share Everything, Updated at: Saturday, December 10, 2011

    Speeding up or Optimizing Windows Vista


    windows vista hack
    Windows Vista is not the fastest operating system, many people even consider it as a 'product failure' from Microsoft. Various issues such as compatibility with the drivers, slower and more. But not to worry, you can tweak Windows Vista to be as fast. And the following tips and tricks that you can apply to speed up Windows Vista:

    1. Clean up old files
    In the Performance Information ... click Open Disk Cleanup to delete redundant files. Then click on Start, enter 'defrag' in the Search box and press Enter, click the Defragment Now and wait while you are on your hard disk-defrag.

    2. 'Tame' Sidebar
    Sidebar is good but the more gadgets you add to the sidebar then the consuming system resources and ultimately make your computer slow. Eliminate unnecessary gadgets or right-click on the Sidebar, select Properties and clear the Start Sidebar to disable it once.

    3. Disable unused devices
    Click Control Panel> System and Maintenance> System> Device Manager, right click on the hardware you do not need - eg unused network adapter? - And select Disable. But when you disable the wrong one will make the hardware could be a problem as the computer can not restart, so if in doubt you should not need to be done.

    4. Disabling unwanted services
    Type 'Services' in the Search box and press Enter to see what has been marked as 'Started' and run on your computer. Service that you might not need to run as the Distributed Link Tracking Client (whose function is to keep the NTFS file links in the network) and Tablet PC Input Service (unless you use a Tablet PC). Click 2x in a service that is not desired, select the Startup type to Disabled and the service it will not run when the computer starts up again later. Be careful, some services are vital to your system and disable the service will create problems later. To find out what a vital service you can learn from sites like Black Viper, and if you are in doubt about a service then let it keep running.

    5. The problem with a long boot time
    If your computer is up to date but when booting the computer is very slow (more than three minutes) then there might be problems with hardware or drivers. Try to unplug all connected to a computer other than the monitor, keyboard and mouse. But if you are connected to the network trying to pull the plug the network cable and see what happens.

    6. Check the error in the Event Viewer
    Find clues in the Event Viewer (type 'eventvwr' in the Search box and press Enter). Expand Windows Logs and Applications and System logs browse. Navigate to the bottom where the last time you shut down the computer and look for error messages that might explain why your computer becomes problematic.

    7. Tidy up your cluttered system tray
    Notice all the icons in the system tray. There are important items such as antivirus programs and there are also items that are not so important to appear there as QuickTime. To eliminate the right-click or click 2x on the icon and look for options that can tell the program to not appear in the system tray.

    8. Check the task of running
    Some programs that run in the background will always be active however, and without knowing it can increase memory usage and processor performance. To find out, right-click on the Taskbar, select Task Manager> Processes. Now try to be observed. If you mensortirnya based on CPU usage, then you will see the background processes that are running. If you see an unknown programs and spend 10 percent or more of the CPU time then right click and select Properties to see more details. Once you find which program has a troubled process, try to check the documentation to find out whether you really need the program running or not.

    9. Get rid of unwanted startup programs
    Run Windows Defender and click Tools> Software Explorer to view the programs that run when Windows just started (start). Do not immediately remove all, but when you delete the program believe that it is not necessary, how to click and select Disable to stop running when the initial (start).

    10. Prune 'overweight' system with Autoruns
    Each program on the computer that runs when the initial (start up) will increase boot time. Of the few programs exist that are important, but others sometimes do not matter. Prune the programs that are not important with free Autoruns program. Autoruns display of the tabs - each tab displays the start-up programs in accordance with the category. Just look at the Logon tab. Before you do anything with Autoruns program right click first on the program you want to 'prune' and select Search Online to learn more about the program. Once you know that the program you want to prune it really was not important then you can delete it - by right click and choose Delete. Click Yes when you get a confirmation. This action is to avoid memory loss in the future.

    11. Update drivers
    If you experience problems with your computer's performance, try to regularly update your hardware drivers to the latest release because usually party hardware manufacturers update hardware drivers periodically to address bugs or to improve the performance of hardware. You can find the latest updates on the hardware manufacturer's website.

    12. Tweak advanced settings
    Even if there are no new drivers for a hardware device, you can still speed up your hardware again. Click Control Panel> System and Maintenance> Device Manager and expand the Network Adapters section, right click on the adapter and select Properties> Advanced. Adjust the settings there, adjust to the needs and possibilities of settings that exist in the Advanced tab will be the same for other devices as well.

    13. Stop to index Search
    Service to index to speed up searches, but if you include people who rarely find a file then just turn off. Open Computer, right click on your hard disk and clear the Index This Drive.

    14. Turn off the legacy support
    Open REGEDIT and browse to HKEY_LOCAL_MACHINE \ SYSTEM \ CurrentControlSet \ Control \ filesystem. Ntfsdisable8dot3namecreation setting to 1 and thus will not make a version of the file name such as DOS, setting the NtfsDisableLastAccessUpdate means Windows will not update the Last Accessed date in a folder when you see it. Two measures that would help a little hard disk performance.

    15. Get more speed from the SATA hard disk
    You can improve a little extra performance from a SATA drive by going to Control Panel> Performance and Maintenance> System> Device Manager> Hard Drives, then right-click your drive, select the Policies and Enable Advanced Performance.
    Beware: Microsoft says the increase is happening will increase the chance of data loss if your hard disk suddenly can not get electricity supply. Do this if you have backup power for your computer such as UPS (Uninterruptible Power Supply) or you may be ready to take the risk.

    16. Simple but fast
    Click Control Panel> System and Maintenance> Performance Information and Tools> Adjust visual effects> Adjust for best performance to speed. Enable transparent glass if that was too simple.

    17. Try ReadyBoost
    Computers that are slow in general will benefit from the use of a USB drive as a ReadyBoost drive - but ReadyBoost is not a substitute for additional RAM. Before starting make sure your USB memory card ready for use. You will need a USB with a minimum capacity of 256MB and a maximum of 4GB and need to be ready for a special rate: 2.5MB per second for random reading and writing of 1.75MB per second for random. ReadyBoost will test a USB memory when first plugged in (Speed ​​up my system) and if there are problems with the USB drive then ReadyBoost will refuse to use it

    18. Delete SP1 uninstall files from
    If you have started your hard disk is not sufficient anymore and Service Pack 1 does not pose a problem at all and you could be sure if you do not want to remove it then use the tools provided by Microsoft to clean uninstall files of 800MB. Simply by typing vsp1cln.exe in Start Search and press Enter to launch it. This tool will remove all the old files, freeing up hard disk and your computer will be faster and convenient to use.

    19. Playback system for faster
    System Restore allows you to 'roll back' Windows Vista to a previous point without impacting on your files. You can run it through Windows Vista or in Safe mode by clicking Start> Control Panel> System and Maintenance> System> System Protection> System Restore.

    20. Turn off System Restore
    In Windows Vista you can set a restore point, so you can restore your computer back to before the computer is in trouble. But the set point will take some hard disk space and power. So if you have a poor computer performance, try to turn off System Restore. Most effective way is to always backup the files on a regular basis and your important data so that even if you turn off System Restore then it will have a positive influence.

    21. Save your time with the Scheduled Tasks
    If your computer is left out all night when you are not using it, then you can schedule tasks for your computer while you're not in front of the computer. Open the Start Search, type 'Task Scheduler' and press Enter. Once the Scheduler is opened, select the tasks and then edit the desired time and how long it took. Task (task) that may be you often do is Disk Defragmenter and System Restore.

    22. Turn off Aero
    For those who have computers with low specs is better to turn off Windows Aero to increase computer speed. Render transparent taskbar is quite wonderful it would be burdensome and ancient graphics card by turning it off will increase performance for your computer. To turn off Aero right click on desktop, click Personalize> Windows Color and Appearance and turn off the transparency to optimize the performance of your computer.

    23. Optimize registry in an easy way
    Cleaning the registry can 'cure' some problems that occur on a Windows Vista-based computer. Even defrag the registry will have a pretty good same as when you defrag your hard disk. You can download a registry defrag tool from www.registry-clean.net or you can use TuneUp Utilities 2009

    24. Windows Trace Service
    Open Task Manager on any computer and you will see the same names are: svchost.exe. Each copy of svchost.exe running services (service) Windows, Some of these can be turned off to conserve RAM usage. Find a copy of svchost.exe that uses the most memory, right click and select Go to Service (s). Can find out info on the Black Viper to see what is safe to shut down.

    25. Optimize SuperFetch
    Settings SuperFetch in Windows Vista is designed to maximize performance and Tweak VI (available for download on the Totalidea Software) has a section devoted specifically in routine cleaning incriminating computer logs. To access it, select System Information and Tweaks> Hard drive information ... Move to Superfetch and Prefetcher optimization tab and follow the instructions.

    26. Turn off automatic defragmentation
    Your computer will slow down when Defragmenter program is running, so maybe you better do it manually - turn off scheduling by removing the check mark in the Run in exactly in the existing Schedule (recommended). Or the other way you can schedule defragmentation when you are not using your computer, for example during lunch hour.

    27. Set the priority of an application
    Sometimes a program when it opened just running around alone, consuming all the CPU power and hard to shut down. Open Task Manager, right click on the program and select Set Priority> Below Normal. Set the priority programs of this menu according to your interests.

    28. Eliminate external drive quickly
    Gadget Remove Drive Safely 'sit quietly' in the Windows Sidebar and serves to disconnect the USB drive, SATA and eSATA by clicking your mouse, but it functions also to recognize the new drive is installed. You can disconnect one or more drives are located in the Sidebar with gadgets downloaded from Windows Live Gallery, or click on a positive sign in the Sidebar and select the Get more gadgets online.

    29. Turn off the network printer search
    If you are connected to the computer network, but does not share the printer with anyone, then you can speed up your computer by turning off the search for network printers. Open Network and Sharing Center, then under Printer Sharing, click the down arrow and select Turn off printer sharing before clicking Apply.

    30. Close the program quickly
    Many people use this trick now: to cover everything from Internet Explorer browser window to the Windows Media Player to be faster than using a mouse can be done, press the Alt key on your keyboard, then press F4. Maybe it will take time to get used to this shortcut, but once you get used to it you'll notice that the computer becomes faster.

    31. Get the authority quickly
    Press the Windows key on your keyboard to open the Start menu and type the program name you are looking for - press the Ctrl and Shift and Enter, followed by Alt and C and you will open the program with full authority as an administrator without'll have to click again.

    32. Rename files in the group is easy and fast
    When you select a number of large files that you need to rename it rather than having to do it one by one, you can rename it with a few clicks away. Hold down Ctrl and left click on each file or left click and drag to select all files you want. Then press F2, type the same name for all files, then press Enter and all files will automatically have the same name, which distinguishes only the numbers behind it.

    33. Manage your files
    Want to 'throw' file to the appropriate folder? Download free Magic Folder Gadget of davecra.spaces.live.com - this gadget aka create a virtual folder where you can drag files. You can get rid of all the files to a folder or prepare to move those files to specific locations based on its file type. Alternatively, you can menownload Magic Folder gadget for Windows Sidebar, where the latter you can drag files into it and the gadget can automatically move them to the appropriate folder.

    34. Using the Send To function
    Type in% APPDATA% \ Microsoft \ Windows \ sendto in the Start> Run box or Address bar to open a personal folder sendto. Drag a program shortcut to the folder (press Ctrl as you drag it to make sure that you copy not move) and you can open the file in the program by just right clicking on the file and select Send to> Program name. This is very useful if for example you have several different image-editing tools and you only need to pick one up as the default application.

    35. Find more
    Performance Monitor can tell you which applications are using the processor, memory, hard disk and network. Type 'Performance Monitor' in the Start Search.
    Reference [Dede]

    Posted by: Zein Okeh Share Everything, Updated at: Thursday, December 08, 2011
    Related Posts Plugin for WordPress, Blogger...
    Powered by Blogger.