Find info about electronics prices, discounts, top deals in link, like US below.

Setup Dual boot windows 8 and windows xp


Setup dual boot windows 8 with windows xp is very easy to do, and if you want to dual boot with windows 7 can be done. But in this post I will discuss is to make dual boot windows xp and windows 8.

Windows 8 is the latest product of windows that can be used on tablet pc, which has a x86 and x64 systems and most likely Windows 8 can not be used on android tablet because they are different systems, the android system uses ARMv7  that can not be used to install windows 8, but you must use LIBSDL or Bochs, an app that makes it possible to run different operating systems like linux ubuntu on android, windows 98, windows xp etc..
windows boot manager
Here's how to set up a computer to dual boot between windows 8 and windows xp.

1. Create two partitions, the first drive: C for use windows xp and drive: D to use Windows 8. Minimal capacity to Drive: C is 10GB while the Drive: D 20GB.
2. After making two partitions, install windows xp first. Iinstall windows xp installation at Drive: C.
3. Furthermore, after installing windows xp do windows 8 installed on drive D.
4. Once both pieces of the operating system is installed, the boot will stay on windows 8.
5. In windows 8 do the settings for dual boot, by hover your mouse cursor to the right of your monitor which will display a widget to do the setting.
6. Click on Settings and then click Control Panel.
7. In the Control Panel window click System and Security, click System
8. On the left side of the window system, click on the fourth is Advanced system settings.
9. Once the window opens, click Settings in the Startup and Recoverry which will display a new window that there are two options in the Default operating system Operating system select Earlier Version of Windows and then click Ok.
dual boot windows xp and windows 8

10. Restart the computer, if it is successful then the first look at the computer at startup option menu will pop up a window to select Earlier Version of Windows and Windows 8, Earlier Version of Windows is the first operating system to install that is the windows xp.

May be useful

Posted by: Zein Okeh Share Everything, Updated at: Monday, November 05, 2012

Angry birds star wars download in 8th november


The latest angry birds games will be downloaded later on 8 november, angry bird is the game version of star wars.
Rovio developers are in Finland is developing various features of the angry birds star wars by adding a few characters on star wars movie such as Luke sky walker and Princes Leia. In this angry bird star wars game enemies were adjusted with the enemy star wars style, how to play almost the same with previous angry birds.
angry bird starwars

The uniqueness of this game is the character that star wars style birds with a laser sword held by Luke Skywalker is on star wars movie, so by playing star wars Angry birds with red bird with a style that will emit a laser sword as they will destroy his enemies, different from the little pink birds Princes Leia,she will emit a pink laser into his enemies when started to fly.


You can download Angry Birds Star Wars here
Reference : Berita Teknologi

Posted by: Zein Okeh Share Everything, Updated at: Saturday, November 03, 2012

Asus Transformer TF101 only in apx mode wont turn on


One of the causes of android wont to turn on and always only in apx mode because the internal sdcard corrupted or the system that can handle it.

My experienced this on the asus transformer tf101, after install the jellybean rom, android can not boot. If the boot would be very long and never got into the display, booting animation that goes on. After I open the adb shell on the computer and I am backing up data on sdcard, then I format mmcblk0p *  reboot the android become wont turn on, always on the circumstances only in apx mode.

Many times I tried to start it but it still won't turn on. My Asus transformer tf101 is broken, that's my mind at that time. I've given up.


The first time I was very shocked and I think my android is broken and tf101 could not be used to fix, I was to take to the place of service, but I am curious, then i plug my android to computer and I open in terminal ubuntu and windows xp in cmd.exe then I typed in terminal lsusb and there are my android tablet on the State of apx mode, and I look in the windows device manager did in fact exist only in android apx mode.

Then I search in google one by one I open forum and tried every step in forum but there has never been a successful android still only in apx mode cannot be turned on, I followed the steps like tap the power button and the volume button down still does not want to turn on.

It was the thing to do with the way flash again with nvflash and download the firmware to suit our android official site.
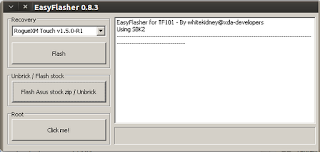
easyflasher flash asus tf101
For those who use the asus transformer if the tablet in apx mode only can use the EasyFlasher, can only be used for the sbkv1 and sbkv2 versions, follow the steps below:

1. Download EasyFlasher here

2. Download the appropriate firmware with the tablet in asus official website, here

3. Save the download in a folder that is in asusupdate in folder EasyFlasher

4. Do not extract with winrar or winzip.

5. Click the button asus stock zip/unbrick, wait a few minutes

6. Once done restart the asus tf101.


Using EasyFlasher then the Asus tf101 android can be unroot  or unbrick. To pass easyflasher rooting could use as well, with the click of a button Click me on the third part with the root and add the CWM recovery with three option on the first button, as shown in the image above.

EasyFlasher on XDA Developers site here

I hope this helps


Posted by: Zein Okeh Share Everything, Updated at: Thursday, November 01, 2012

Asus tf101 problems wont boot always back to cwm recovery


It looks like my Tablet Asus transformer tf101 having problems, always go back and forth after install the bootloader and install the ROM between ICS and Jellybean in cwm recovery, but the same result, i.e. at the time after reboot the tablet back to the display of the CWM recovery, do not want to boot into Android operating system.

At first after I update asus tablet to jellybean 4.1.2, do not experience the problem and any boot smoothly, however after I install an application and I reboot, suddenly my android asus tablet  tf101 was unable to boot, boot takes a very long time, almost a few minutes and maybe if I leave it will continue to boot on the first screen animated images. After a few times I reboot and install the bootloader, kernel and suddenly got the asus transformer tablet tf101 was unwilling to boot always return to cwm recovery.
error android tablet
image by Aaronfisher1904 via photobucket.com


Then what I do is to format the data and systems sdcard through the CWM recovery 5.8.1.8 but the result remains the same, then I do Wipe Dalvik Cache, but in fact there is an error message that I got, the error is E: unknown volume for the path [/sd-ext].

Once I figure out the forums turned out this is due to the problematic volume and sdcard is corrupted, this makes me so confused because the only way is to repartition internal sdcard, with of course all the data contained in the android will be remove. Finally I found a way that is easy, and there are several ways that can be repeated without making data be deleted, however it makes me confused because of the way a little bit, But I decided to try the backup data in sdcard through ADB shell in terminal of ubuntu, and successfully, for data on sdcard is still available. For those who do not yet know how to backup via adb, try some of the following steps.

1. Download the Adb to linux or windows here
2. After download and install, plugs your android usb cable  with your computer.
3. Open terminal in ubuntu linux or cmd in windows, type ' ADB devices ' without quotation marks, to connect between your pc and android.
4. Once the devices are detected.
5. Type ' adb shell ' and typing ' cd/sdcard ' and typed ' ls ' to find out which data will be backed up.
6. backing up data in terminal or cmd and typing "adb pull /sdcard/data name /media/Data/backup", meaning /sdcard/data name is the data from android sdcard will be backed up and '/media/Data/backup' is the data storage .


Note: If after the adb shell and by typing cd /sdcard  there is no data then have to do is go back to cwm recovery android if tablet still open he cwm recovery and click install zip file and click install from sdcard and then click choose zip from sdcard, go back to terminal or cmd in computer, and type adb shell cd /sdcard/ -> ls, see if there is still data in the sdcard, if no then it is likely the data on sdcard is erased.


After that to perform partition on your android tablet after installing cwm recovery v 5.8.1.8 do the below.

1. Push the power button and the volume down simultaneously for about 10 seconds
2. Select advanced then select Partition SD Card
3. For the 16 GB select the 1024M i.e. 1 GB ext.
4. for Swap size you can select 0 m or whatever, wait a few moments and then reboot


If after the reboot the android is still the same result, for the asus transformer with the tf101 sbk1 and sbk2 could use easyflasher, to download easyflasher can visit  xda developers site here.

Posted by: Zein Okeh Share Everything, Updated at: Thursday, November 01, 2012
Related Posts Plugin for WordPress, Blogger...
Powered by Blogger.